
 一般 ESXi 在升級時動作很簡單,用隨身碟開機後,點幾個不太需要思考的選項後,短時間內即可完成安裝。不過這次我的 HP 伺服器在更新 ESXi 5.5 至 6.0 時,遇到了一個 “Mellanox_bootbonk_net” 的錯誤,不僅導致更新失敗,且原本的 ESXi 也壞掉,因此只好重新安裝 ESXi。
在 ESXi 安裝過程中,選好目的磁碟後,會有三個選項:
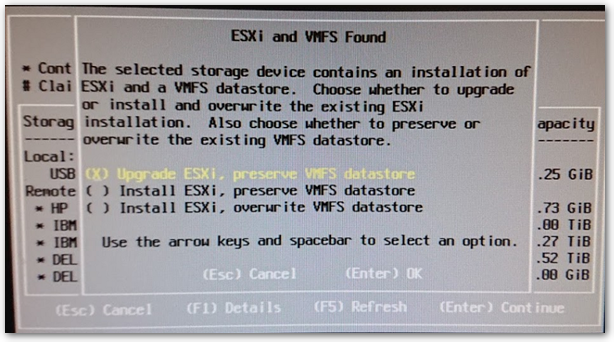
Upgrade ESXi, preserve VMFS datastore
# 更新 ESXi,並保留 VM。

Install ESXi, preserve VMFS datastore
# 重新安裝 ESXi,並保留 VM。

Install ESXi, overwrite VMFS datastore
# 重新安裝 ESXi,並清除 VM。
正常的狀況會選擇第一個,而由於我已升級失敗,且導致原有 ESXi 損毀,因此只能在第二、三個選項做選擇。查詢相關資料後,由於我選的 ESXi 是裝在伺服器的本機硬碟,而 VMs 是放在 Storage,再以光纖界接,因此當我選擇「本機磁碟」後,跳出的這三個選項,第二跟第三對我來說是一樣的,因為他清除的會是我本機磁碟,但我的本機磁碟並未包含任何 VMs。
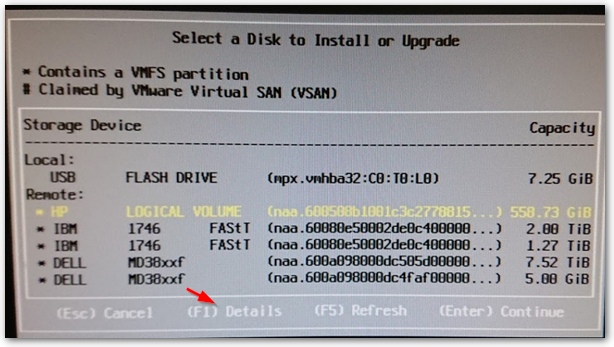
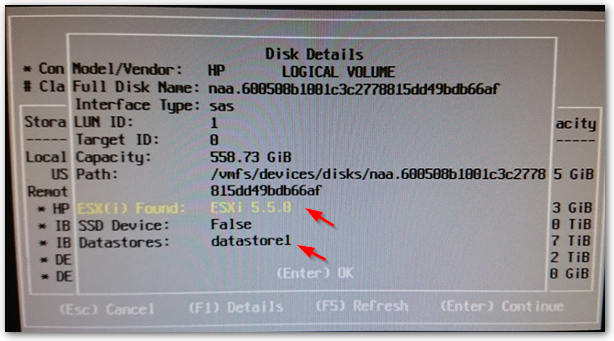
這邊會建議在選擇磁碟時,可以先按 F1 查看詳細資訊,裡頭除了會告知所選磁碟是否已有 ESXi 外,還會列出其 datastore 的名稱,可藉此判斷會影響到哪個 datastore。
In my case,他秀出的就是本機的 datastore,Instead of on the Storage。If you still feel uneasy,Most foreign sources would suggest just unplugging the fiber optic cable,This way, no matter which option you choose,You can ensure that your Storage's datastore will never have issues。
Actually, using the reinstall method doesn't take much more time than updating,Maybe my environment is relatively simple,After completing the installation,I mainly set up the following items,即可讓 ESXi Server 回去上工:
◎ Management IP。
◎ vSwitch 設定。
◎ 授權指派。
◎ NTP 設定。
◎ FQDN 設定 (DNS和路由)。
◎ 拉進 vCenter 叢集。
另外,關於 HP 伺服器升級 ESXi 遇到的 “Mellanox_bootbonk_net” 驅動衝突的錯誤,我事後有在網路找到相關教學,這篇是在 5.5 升 6.5 時遇到的,並有一步一步教學如何判斷既有 ESXi 有沒有用到此驅動,以及移除的方式,寫的很詳細。
【參考連結】

")
")


