
 ◎ Server OS: Windows Server 2019
◎ OpenVPN: OpenVPN 2.4.9 (Community)
◎ AD 驗證元件: Auth4OpenVPNv2.0
◎ Client OS: Windows 10
由於公司的 VPN 硬體設備老舊,最近在 survey VPN 的解決方案,想說先從開源的解決方案下手,一開始想到的就是五年前測試過的 OpenVPN,但到官網下載 VM 映像檔並建置完成後,才發現此版本僅開放兩個 client 免費連線,要更多就要訂閱。心想原來開始收費了,難怪 Server 跟 client 端 (OpenVPN Connect) 的軟體介面都變得這麼漂亮,印象以前都是要透過記事本去改設定的。
之後找到來自日本的 SoftEther VPN,花了些時間研究及建置後,原本以為這套應該可以用了,沒想到最後在做測試時,發現 SoftEther VPN 有個 drop SQL 連線的 bug,且網友已經回報 issue 兩年了,官方還是沒有修正,因此只好忍痛放棄。 SoftEther VPN 的設定方式,Refer to[Notes] SoftEther VPN Server Configuration。
後來回過頭找 OpenVPN 的相關授權資訊,結果才找到 Community 的版本,下載安裝後,熟悉的文字檔設定畫面再度出現,哈。下方為本次建置的目標與設定方式:
【目標】
◎ Server 使用 Windows 系統。
◎ 使用 AD 做為帳戶驗證方式。
◎ Client 端使用獨立網段,並可自動取得 IP。
◎ Client 端僅針對特定網段的流量會流量 VPN,上網 (Internet) 不會。
◎ Client 端可以連到企業內部的其他網段。
◎ 首先,到 OpenVPN Community Downloads 頁面下載最新版本。
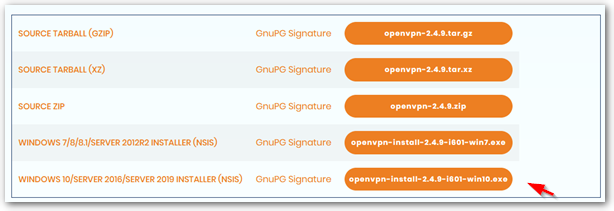
◎ 接著參考社群的 Easy_Windows_Guide,完成 Server 與 Client 設定,以下擷錄重點設定。
【前置作業】
◎ 安裝時請自行勾選 “EasyRSA 2 Certificate Management Scripts” 元件。
◎ 以「系統管理員身分」執行 cmd,並依序執行下列指令:
cd "C:\Program Files\OpenVPN\easy-rsa"
init-config
notepad vars.bat
◎ 修改預設的憑證資訊,改完後存檔。
set KEY_COUNTRY=US
set KEY_PROVINCE=CA
set KEY_CITY=SanFrancisco
set KEY_ORG=OpenVPN
set KEY_EMAIL=mail@host.domain
◎ 依序執行下列指令:
vars
clean-all
【建置憑證與金鑰】
◎ 執行下列指令:
build-ca
◎ 輸入憑證資訊:
Country Name (2 letter code) [US]:
State or Province Name (full name) [CA]:
Locality Name (eg, city) [SanFrancisco]:
Organization Name (eg, company) [OpenVPN]:
Organizational Unit Name (eg, section) []:
Common Name (eg, your name or your server’s hostname) []:
Email Address [mail@host.domain]:
◎ 依序執行下列指令:
build-key-server server
build-key client
# Guide 上是建議用 client 端的電腦名稱,然後為每一台電腦產生一份憑證,
# 但因為我主要是要用 AD 驗證,所以我這邊是只產生一份名為 client 的憑證,然後讓所有電腦一起使用。
build-dh
"C:\Program Files\OpenVPN\bin\openvpn.exe" --genkey --secret "C:\Program Files\OpenVPN\easy-rsa\keys\ta.key"
【設定 Server config 檔】
◎ 執行下列指令:
copy "C:\Program Files\OpenVPN\sample-config\server.ovpn" "C:\Program Files\OpenVPN\easy-rsa\keys\server.ovpn"
notepad "C:\Program Files\OpenVPN\easy-rsa\keys\server.ovpn"
◎ 找到以下文字。
ca ca.crt
cert server.crt
key server.key
dh dh2048.pem
◎ 取代成:
ca “C:\\Program Files\\OpenVPN\\config\\ca.crt”
cert “C:\\Program Files\\OpenVPN\\config\\server.crt”
key “C:\\Program Files\\OpenVPN\\config\\server.key”
dh “C:\\Program Files\\OpenVPN\\config\\dh2048.pem”
◎ Save and close。
◎ 找到以下文字,Remove the leading comment semicolon(;)。Since I plan to create only one certificate to be shared by everyone,This may cause different clients to get the same IP,Therefore, enable this setting,So everyone can get a different IP。
;duplicate-cn
[Set up Client config file]
◎ 執行下列指令:
copy "C:\Program Files\OpenVPN\sample-config\client.ovpn" "C:\Program Files\OpenVPN\easy-rsa\keys\client.ovpn"
notepad "C:\Program Files\OpenVPN\easy-rsa\keys\client.ovpn"
◎ 找到以下文字。
ca ca.crt
cert server.crt
key server.key
tls-auth ta.key 1
◎ 取代成:
ca “C:\\Program Files\\OpenVPN\\config\\ca.crt”
cert “C:\\Program Files\\OpenVPN\\config\\client.crt”
key “C:\\Program Files\\OpenVPN\\config\\client.key”
tls-auth “C:\\Program Files\\OpenVPN\\config\\ta.key” 1
# The guide doesn't have this part,This is the error that appeared when I ran the client,And how to fix it。
◎ Change the following “my-server-1” to the actual FQDN or IP address of OpenVPN。
remote my-server-1 1194
◎ Save and close。
[Copy the certificates、and keys to the correct directory]
◎ 執行下列指令:
robocopy "C:\Program Files\OpenVPN\easy-rsa\keys\" "C:\Program Files\OpenVPN\config\" ca.crt ta.key dh2048.pem server.crt server.key server.ovpn
◎ In “C:\Program Files\OpenVPN\easy-rsa\keys\”,copy the following files:
ca.crt
ta.key
client.crt
client.key
client.ovpn
◎ Paste them onto the client computer “C:\Program Files\OpenVPN\config\”
PS. client 的安裝檔跟 Server 一樣。
【啟動 OpenVPN】
◎ 在 Server 以「系統管理員身分」執行 OpenVPN GUI。如果不以「系統管理員身分」運行也可以,但可能部份 log 會沒有寫入權限。也可以在「Windows 服務」,將 “OpenVPNService” 的「啟動類型」改成”自動”,並按右鍵「啟動」。
◎ Client 端直接執行 OpenVPN GUI,並在右下角的圖示按右鍵選擇「連線」即可。Client 亦可安裝介面比較好看得 OpenVPN Connect,並將設定檔 (client.opvn) Drag into the window to proceed。
The above is the main tutorial content of Easy_Windows_Guide,After completing the above settings,you can connect using certificates,Next, adjust the settings to the environment I want:
◎ Client 端可以連到企業內部的其他網段。
◎ 使用 AD 做為帳戶驗證方式。
[Allow the Client to connect to other internal corporate network segments]
After OpenVPN is set up,by default the Server will create a virtual network adapter,its IP is 10.8.0.1,and the Client will get 10.8.0.6,At this point, the Client can ping 10.8.0.1 應該要通。
接下來要 ping 伺服器的實體網路卡 (例 192.168.53.1) 會發現不通,此時除了要加入路由外,還要開啟「網際網路連線共用」功能。這邊我卡好久,後來才終於在 ViRb3 網友的「Create an OpenVPN Windows server that proxies internet traffic · GitHub」這篇找到「網際網路連線共用」這個關鍵設定。
◎ 找到 server.opvn 裡的 「;push route “192.168…」
◎ 依其格式,Add the following entry,And save。
push "route 192.168.53.0 255.255.255.0"
# 如果要讓 Client 連到企業內部的其他網段,
# 可以在這邊加入其他網段的資訊。

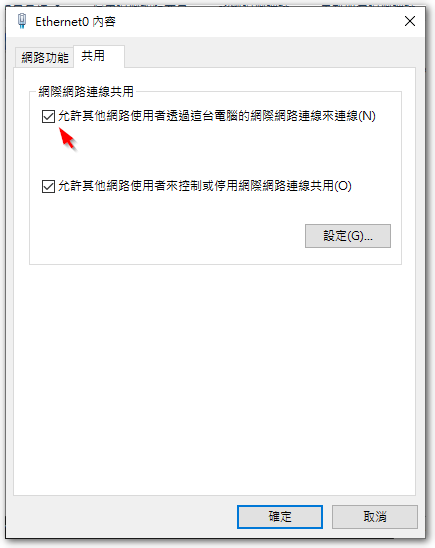
◎ Go to the network adapter settings,Enable the physical network card (192.168.53.1 This) 'Internet Connection Sharing' feature (勾選”允其他網路使用者透過這台電腦的網際網路連線來連線”)。
PS. 找了很多文章才知道要做這個動作,在這邊卡關卡很久。
開啟「網際網路連線共用」功能後,OpenVPN 虛擬網卡的 IP 將會被改成 192.168.137.1,因此我們如果要沿用 OpenVPN 預設的 10.8.0.1,需要修改機碼。
◎ 執行 regedit,到下列路徑:
HKEY_LOCAL_MACHINE\SYSTEM\CurrentControlSet\Services\SharedAccess\Parameters
◎ 將 ScopeAddress 的值改成 10.8.0.1。
◎ 重啟 OpenVPN Server,並讓 Client 重新連線即可。
【使用 AD 做為帳戶驗證方式】
首先,很感謝 J. Ortega. 寫的 VBScript,讓我們可以很方便讓 OpenVPN 夠過 AD 做驗證,感謝感謝再感謝。在「Active Directory Authentication for OpenVPN For Windows Implementations – amigo4life2」這個網頁有很詳盡的設定說明,不過因為年代久遠,所以後續在 Windows 2008、2012 以後的版本,還有些動作要做,以下為整理後的設定方式:
◎ 下載 Auth4OpenVPNv2.0.zip,並將內容解壓縮至 “C:/Program Files/OpenVPN/Config”
◎ 修改 Auth4OpenVPN.ini,輸入 AD 的相關資訊,範例如下:
Server = "192.168.53.20"
Domain = "abc"
DN = "dc=abc,dc=com,dc=tw"
Group = "(Group)OpenVPN"
Logging = "On"
接下來的動作,會與 J. Ortega. 網頁上稍有不同,此為 iceh 網友在 OpenVPN Community 論壇 針對新版 Windows Server 安全性的問題做的修正,在此也很感謝 iceh 網友。
◎ 開啟記事本,貼上以下內容:
set LOCALAPPDATA=C:\Users\%USERNAME%\AppData\Local
set CommonProgramFiles=C:\Program Files\Common Files
set CommonProgramFiles(x86)=C:\Program Files (x86)\Common Files
set CommonProgramW6432=C:\Program Files\Common Files
C:\Windows\System32\cscript.exe "C:\Program Files\OpenVPN\config\Auth4OpenVPN.vbs"
exit %errorlevel%
◎將檔案儲存到 “C:\Program Files\OpenVPN\config”,檔名為 “Auth4OpenVPN-64bitWrapper.cmd”。
◎ 在 server.ovpn 加入下面兩行指令:
script-security 3
auth-user-pass-verify Auth4OpenVPN-64bitWrapper.cmd via-env
◎ 在 Client 端的 client.ovpn 加入下面兩行指令:
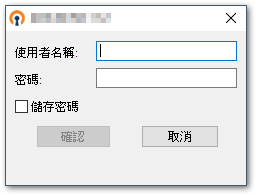
auth-user-pass
auth-retry interact
◎ 如此,Client 在連線時,便會跳出帳號密碼視窗來登入。
【補充資訊】
◎ Auth4OpenVPN 有提供測試功能,建議可以先以下面指令測試連線 AD 沒問題後,Then proceed with the following steps。
auth4openvpn.vbs <user> <password>
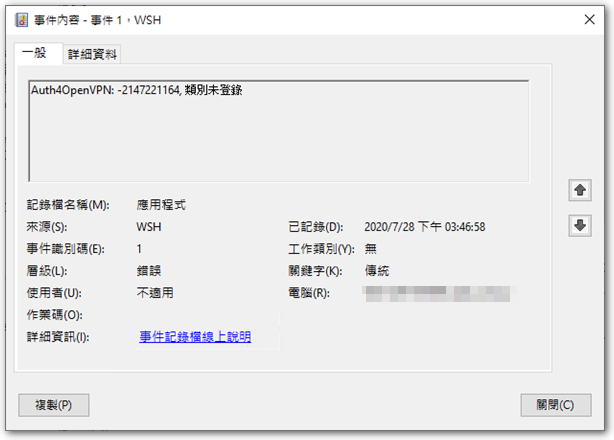
◎ Auth4OpenVPN will leave authentication results in the Windows application log,If set according to the original webpage method,可能會出現 “Auth4OpenVPN: -2147221164, 類別未登錄” 的錯誤訊息,此時依照 iceh 網友提供的 “Auth4OpenVPN-64bitWrapper.cmd” 的修復方式,便可解決環境參數的問題。
◎ 如果要讓 client 可以透過企業的網路上網 (Internet),只需在 server.ovpn 檔找到下面字串,並將前面的註解(;)拿掉即可。
;push "redirect-gateway def1 bypass-dhcp"
◎ OpenVPN Connect 在匯入 client.ovpn 檔時,會檢查憑證與金鑰檔有沒有跟 client.ovpn 檔在同個目錄,If there won't be errors,。After completing the import,,When connecting afterwards,,Only OpenVPN Connect will follow the client.ovpn settings to read the certificate and key files from the specified path.;OpenVPN GUI does not have this issue.。
◎ If you want to enable OpenVPN to authenticate with Windows local accounts,you can refer to what netizen smiley22 shared SAMAuth4OpenVPN 元件。
◎ I eventually did not adopt this solution,because there is filtering for OpenVPN in Mainland China,so the connection process may encounter some strange issues.。
【參考連結】
- Community Downloads | OpenVPN
- Easy_Windows_Guide – OpenVPN Community
- Active Directory Authentication for OpenVPN For Windows Implementations – amigo4life2
- (Semi-)Fix for Auth4OpenVPN – Win2008R2 / Win2012R2 – OpenVPN Support Forum
- Create an OpenVPN Windows server that proxies internet traffic · GitHub
- OpenVPN authentication issue – OpenVPN Support Forum
- OpenVPN Server on Windows ~ Defron.org: Technology, Security, Privacy
- Dead Fox's Single Volume: Detailed Explanation of Routing in OpenVPN
- Release SAMAuth4OpenVPN v1.0.0.2 · smiley22/SAMAuth4OpenVPN · GitHub
- [Tutorial] OpenVPN for Windows Environment Setup Guide @ Fresh Afternoon Tea :: Pixnet ::

")
")


Hello. Thank you for your tutorial but I must admit I'm struggling. Let me explain :
I managed to create a server file on my Windows ( server essentials 2016) et je me connecte dessus depuis Windows 10 avec mon fichier client. La connexion se fait.
Mais arrivé à l’étape du ping, quand je ping l’adresse 10.8.0.1 depuis mon poste client, résultat négatif.
Par ailleurs, dès que j’arrive à connecter mon client et lin serveur, je n’ai plus de connexion internet sur mon poste client.
Auriez vous une piste pour m’aider à sortir de ce…..
Est ce que le fait que ce soit une version essentials peut empêcher le ping ?
您好,如果連10.8.0.1都ping失敗的話,那麼蠻有可能VPN連線是建立失敗的,預設的情況下,10.8.0.1是可以被ping的。
You might refer to the steps in my article,,Try setting it up step by step,,Good luck,謝謝