
![]() Recently started moving hosted WordPress sites to Synology NAS,在資料庫匯入這塊,如預期般的遇上不少問題,花了不少時間研究才一關一關的解決,把這個過程記錄一下,分享給需要的人。
Recently started moving hosted WordPress sites to Synology NAS,在資料庫匯入這塊,如預期般的遇上不少問題,花了不少時間研究才一關一關的解決,把這個過程記錄一下,分享給需要的人。
【環境】
- Synology 的 MariaDB、phpMyAdmin 已建置完成。
- 已從代管網站下載 .sql 檔,大小約 250MB。
- 本地端電腦已安裝 DBeaver,本地端的作業系統為 Manjaro。
【重點步驟】
- 透過 SSH 在 MariaDB 新增一個可以從 非 localhost 連線的帳戶。因為一般帳戶的預設設定都只能從 localhost (就是NAS自己)連線。
- 將 MariaDB 的 max_allowed_packet 上限調大。預設只有 1M。
- 在本地端安裝 maria-clients,以供 DBeaver 使用還原資料庫所需的指令。
《新增 MariaDB 帳戶》
# 透過 SSH 連線 Synology NAS
ssh myaccount@192.168.1.1 # myaccount 為 Synology 帳戶;192.168.1.1 為 Synology 位址

# 確認 bind-address 為 0.0.0.0 (預設值)
more /volume1/@appstore/MariaDB10/usr/local/mariadb10/etc/mysql/my.cnf | grep bind-address

# 確認 port 為 3306,且 Synology 上的防火牆有開啟對應的 port
more /var/packages/MariaDB10/etc/my_port.cnf

# 以 root 身份登入資料庫
/volume1/@appstore/MariaDB10/usr/local/mariadb10/bin/mysql --user=root --port=0 --password --host=localhost

# 檢視資料庫現有的使用者
SELECT User, Host FROM mysql.user; # 記得最後要輸入分號

# 建立一個 dbeaver-restore 帳戶,密碼為 superstrongpassword,並允許其從 192.168.*.* 登入
CREATE USER 'dbeaver-restore'@'192.168.%' IDENTIFIED BY 'superstrongpassword';

# 給予 dbeaver-restore 存取所有資料庫的權限
GRANT ALL PRIVILEGES ON *.* TO 'dbeaver-restore'@'192.168.%' WITH GRANT OPTION;

# 斷開資料庫連線
exit
《調整 MariaDB 封包上限》
#  確認目前 [mysqld] 底下的 max_allowed_packet 的數值
more /volume1/@appstore/MariaDB10/usr/local/mariadb10/etc/mysql/my.cnf

# Synology 建議不要修改預設的 my.cnf 檔案
# 而是使用下面路徑 my.cnf 檔來套用自訂值
sudo vim /var/packages/MariaDB10/etc/my.cnf

# 在 vim 按 i 後,貼上下面文字
[mysqld]
max_allowed_packet = 500M # 設成大於 sql 檔大小的數值

# 按 ESC 後,存檔離開
:wq!

# 重啟 MariaDB 服務
sudo /usr/syno/bin/synopkg restart MariaDB10
《透過 DBeaver 還原 sql 資料庫》
1. 由於 DBeaver 需透過 mariadb 或 mysql 來還原資料庫,因此需要先在本機安裝「mariadb-clients」或「mysql-client」套件。
2. 透過 which mysql 指令確認 mysql 的位置,預設會在 /usr/bin/mysql。
which mysql
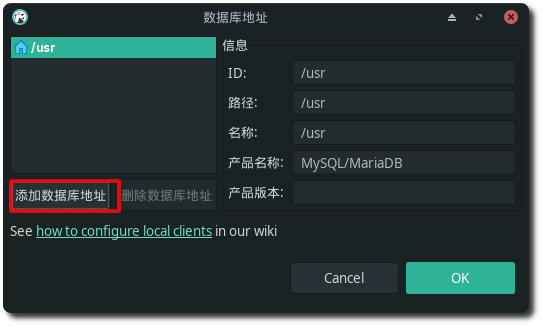
3. 在 DBeaver 設定資料庫連線的畫面中,要去「本地客戶端」設定 mysql 的位置。
在「本地客戶端」點選「瀏覽」。

4. 新增一個 mysql 的位置。
◎ 依 DBeaver 官方文件說明,如果 mysql 的位置在 /usr/bin/mysql,那麼這邊設定成 /usr 即可,略過後面的 /bin/mysql。
◎ 如果 DBeaver 是從 Snap 套件庫下載的版本,這邊的路徑可能會被轉換成 /run/…,這會導致後續執行失敗。如果有遇到這情形,改安裝官方套件庫的 DBeaver 即可。
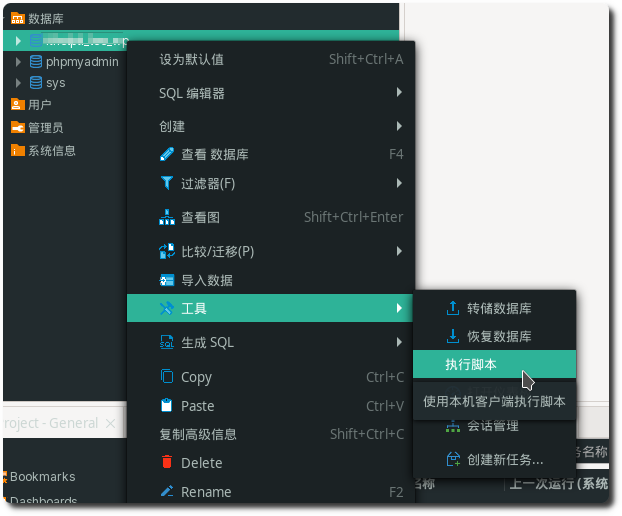
5. 在目的資料庫按右鍵,選擇「工具」-「執行腳本」來還原資料庫。
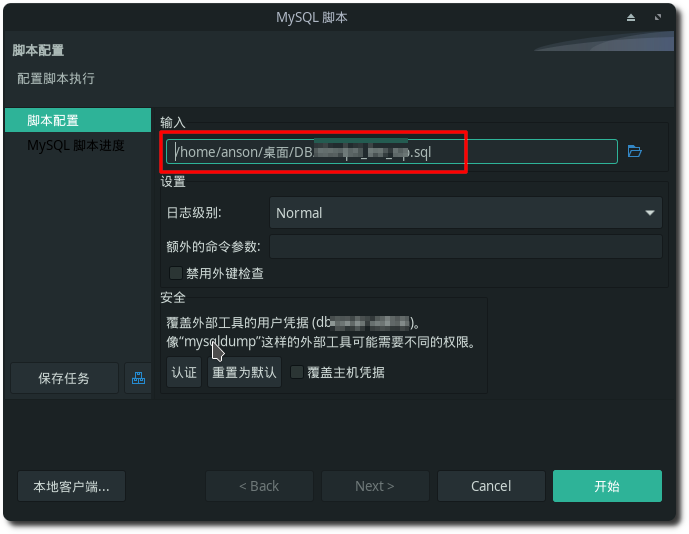
6. 選擇來源 sql 檔,按【開始】即可進行還原。
《參考資料》
- host ” is not allowed to connect to this mariadb | Synology Community
- mysql中grant all privileges on赋给用户远程权限_grant all privileges on *.* to-CSDN Blog
- 鳥哥私房菜 – 第九章、vim 程式編輯器
- 是否可以在 Synology NAS 上自訂 MariaDB 的設定? – Synology 知識中心
- DBeaver Documentation

")
")


Leave a Reply