
 我還蠻少在寫 GIMP 教學的,除了自己會的本來就不多,另一方面總覺得寫圖片編輯軟體的教學,會有大量的步驟跟圖片,還挺費時間,最近在短期內有兩次用到 GIMP 製作 Logo 倒影效果,由於中間要用到遮罩功能,而我對遮罩觀念還不熟(因為幾年才用到一次),所以兩次我都忘記要怎麼做,而透過網路文章的教學才完成,所以這次還是把這個過程給記錄起來好了,這樣下次就不用搜尋別人的文章了,哈。
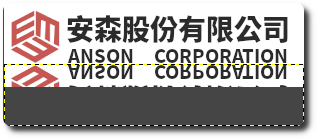
先 show 完成圖,原始 Logo 與增加陰影後的 Logo


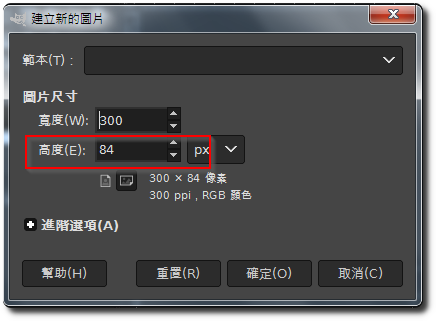
1. 「檔案」-「新增」,新增一個寬度跟原本 Logo 一樣,而高度要比原本的高 (要放倒影的空間)。
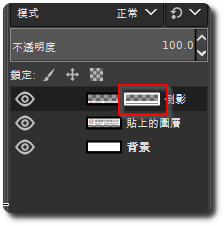
2. 將原始 Logo 複製後,選擇「編輯」-「貼上成為」-「新增圖層」,並將此圖層往上移到靠頂端的位置。

3. 再重複一次步驟2. 的動作,此圖層我暫命名為倒影。

4. 選擇”倒影”圖層,選擇「圖層」-「變換」-「垂直翻轉」,並將其上緣貼其原始 Logo 圖層的底部。
5. 選擇”倒影”圖層,選擇「圖層」-「遮罩」-「加入圖層遮罩」,選擇「白色(完全不透明)」,按確定。

6. 點選剛剛新增的遮罩。
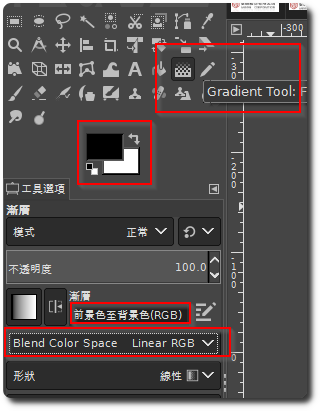
7. 選擇「Gradient Tool (漸層工具)」,確認下列設定值:
前景色:黑
Background Color:White
Gradient:Foreground to Background Color(RGB)
Blend Color Space:Linear RGB
Shape:Linear
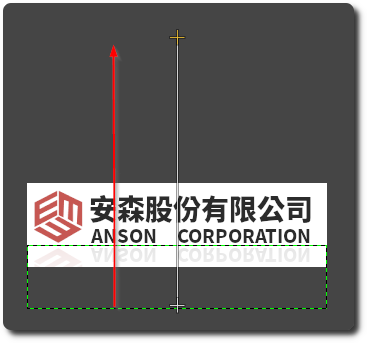
8. Hold Ctrl (to ensure a straight line),Drag a vertical line from the bottom of the image while holding the left mouse button,You can try several times until you achieve the gradient effect you want。
If the gradient effect does not appear here,You can check a few things:
-1. Make sure step 6 was done. ,You need to select”Mask”。
-2. Click 'Select' - 'Deselect All'。
9. after finishing,You can output in your desired image format。
【參考連結】

")
")


Leave a Reply