
 早年使用 AppServ 架的網站遭入侵,Couldn't figure out the reason,Wanted to update Apache、PHP、But the MySQL version was limited by Joomla extension compatibility, so couldn't proceed,Later, there was a need to create another website,Originally planned to switch to XAMPP,But when reading the official XAMPP documentation,Surprisingly, the official recommendation is not to use this software in a production environment,若非得使用,官方雖有建議調整部份設定值,To improve security,但又提醒你,這只能稍微增加一點點安全性而已 (好直白的官方啊~哈),因此便動手研究獨立安裝 Apache、MariaDB、PHP 及 phpMyAdmin。
各套件安裝流程如下:
【Apache】
- 到 Apache Haus 下載壓縮檔 (x64)。
- 解壓縮,先看 readme_first.html 說明。
- 複製 Apache24 目錄到想要的位置。
- 打開 httpd.conf,設定 Define SRVROOT 路徑,如 D:\Web\Apache24。
- In httpd.conf, find Options Indexes FollowSymLinks,Remove Indexes,Prevent directory browsing。
- Run httpd.exe directly,Check if any errors pop up during startup,Then browse localhost with a browser,See if it works correctly。
- In CMD, enter”httpd.exe -k install”,Set Apache as a service (The uninstall command is “httpd.exe -k uninstall”)。

【PHP】
PHP has two versions: Non Thread Safe and Thread Safe,Here we refer to two articles to explain how to choose between them:
“Difference between PHP Non Thread Safe and Thread Safe – WaiMai Blog” 提到:
None Thread Safe means not thread-safe,No thread safety checks are performed during execution。
Thread Safe means thread-safe,Thread safety checks are performed during execution,To prevent launching new threads whenever there is a new request,Exhaust system resources。
…N/A
FastCGI executes operations in a single thread,So there is no need to perform thread safety checks,除去线程安全检查的防护反而可以提高执行效率。
而线程安全检查是为ISAPI方式的PHP准备的,也就是为IIS准备的,因为有许多php模块都不是线程安全的,所以需要使用Thread Safe的PHP。
r,如果是以 FastCGI 执行 PHP ,都建议用 Non Thread Safe 的 PHP (zip安装包)。
PS. 建議前往該篇文章查看完整說明。
“PHP Thread Safe and Non-Thread Safe for Windows – Stack Overflow” 的 Crack 提到:
So it really depends on the way that you want to use PHP:
Apache + LoadModule: Thread Safe
Apache + FastCGI: Non-Thread Safe
IIS: Thread Safe
IIS + FastCGI: Non-Thread SafePHP manual has nice installation instructions.
AFAIR running PHP with FastCGI is the preferable way, it performs faster and allows for more fine-grained security configuration.
從上面兩篇可以得知,使用 FastCGI + Non-Thread Safe 的 PHP 會是比較好的選擇。而實際使用的感受,我從原本的 Thread Safe 改成 Non Thread Safe 後,在瀏覽 Joomla 網站時,竟可以感受到頁面開啟速度的提昇,It surprised me a bit。
Below are listed two configuration methods: Non Thread Safe and Thread Safe。
[PHP – Non Thread Safe](Recommended)
- 到 Official page Download the Non Thread Safe zip file。
- 解壓縮,Copy the directory to the desired location,Rename php.ini-production to php.ini。
- Open php.ini,Modify the following content:
# 搜尋 extension_dir = "ext",改成:
extension_dir = "D:\Web\php-7.4.3\ext"
或
./ext

# 搜尋 file_uploads = On,改成:
file_uploads = Off
# 如果網站沒有用到檔案上傳功能,建議關閉,
# 有需要使用時再開啟,避免被上傳病毒檔案。
# 之前我們 ESET 防毒常攔截到網站伺服器被上傳惡意檔案,
# 直到關閉此設定才沒再發生。

# 搜尋 upload_max_filesize = 2M,改成適合的大小:
upload_max_filesize = 30M
# Joomla 4 的建議值為 30M

# 搜尋 allow_url_fopen = On,改成:
allow_url_fopen = Off
# 如果網站沒有用到檔案上傳功能,建議關閉,
# 有需要使用時再開啟,避免被上傳病毒檔案。
# 之前我們 ESET 防毒常攔截到網站伺服器被上傳惡意檔案,
# 直到關閉此設定才沒再發生。

# 搜尋 ;date.timezone =,改成:
date.timezone ="Asia/Taipei"
# 建議要設,避免部份網站程式的時間有時差。
LoadModule fcgid_module modules/mod_fcgid.so
# 載入 FastCGI 的模組。

# 搜尋 DirectoryIndex,在後面增加:
index.php
Next, there are two approaches,One is the standard method,One is the simple method。
[FastCGI Settings – Standard Method]
- Open httpd-fcgid.conf under conf/extra in the FastCGI directory,to Apache Under conf/extra。
- Open httpd-fcgid.conf,Modify the following content:
# 搜尋 FcgidInitialEnv PHPRC "C:\\php",改成:
FcgidInitialEnv PHPRC "D:\\Web\\php-7.4.6"
# 讓 FastCGI 知道 php.ini 所在目錄。
# 其他的 FcgidInitialEnv 環境參數可視實際環境修正。

FcgidMaxRequestLen 15360000
# 此參數可選擇性增加。
# 根據「壞蛋的密室」文章的說明,
# 此參數為用戶端送來的最大長度資料,預設值為 139072 (135K)。

# 搜尋 FcgidWrapper "C:/php/php-cgi.exe" .php,改成:
FcgidWrapper "D:/Web/php-7.4.6/php-cgi.exe" .php
# FastCGI 設定。
# 搜尋 Include conf/extra/httpd-fcgid.conf,
# 將前面的註解井字號拿掉。
[FastCGI Settings – [Simple Method]
- 開啟 Apache In httpd.conf,Add the following content:
FcgidInitialEnv PHPRC "D:/Web/php-7.4.6"
# 讓 FastCGI 知道 php.ini 所在目錄。

AddHandler fcgid-script .php
# 設定 FastCGI 處理 php 檔案。

FcgidWrapper "D:/Web/php-7.4.6/php-cgi.exe" .php
# FastCGI 設定。

FcgidMaxRequestLen 15360000
# 此參數可選擇性增加。
# 根據「壞蛋的密室」文章的說明,
# 此參數為用戶端送來的最大長度資料,預設值為 139072 (135K)。

# 搜尋 Options FollowSymLinks
# (或 Options Indexes FollowSymLinks,
# 若未在上面 Apache 步驟中去除 Indexes),在後面增加:
ExecCGI
# 讓網頁目錄有執行 CGI 的權限。
<?php
phpinfo();
?>
Reminder:If when running httpd.exe,A path error occurs,可檢查 httpd.conf 的絕對路徑的斜線方向,請以斜線(/)取代反斜線(\)。我原本使用 D:\Web\php-7.4.6 會跳錯,改成 D:/Web/php-7.4.6 才 OK。
[PHP – Thread Safe】
- 到 Official page 下載 Thread Safe 壓縮檔。
- 解壓縮,Copy the directory to the desired location,Rename php.ini-production to php.ini。
- Open php.ini,Modify the following content:
# 搜尋 extension_dir = "ext",改成:
extension_dir = "D:\Web\php-7.4.3\ext"

# 搜尋 file_uploads = On,改成:
file_uploads = Off
# 如果網站沒有用到檔案上傳功能,建議關閉,
# 有需要使用時再開啟,避免被上傳病毒檔案。
# 之前我們 ESET 防毒常攔截到網站伺服器被上傳惡意檔案,
# 直到關閉此設定才沒再發生。

# 搜尋 upload_max_filesize = 2M,改成適合的大小:
upload_max_filesize = 30M
# Joomla 4 的建議值為 30M

# 搜尋 allow_url_fopen = On,改成:
allow_url_fopen = Off
# 如果網站沒有用到檔案上傳功能,建議關閉,
# 有需要使用時再開啟,避免被上傳病毒檔案。
# 之前我們 ESET 防毒常攔截到網站伺服器被上傳惡意檔案,
# 直到關閉此設定才沒再發生。

# 搜尋 ;date.timezone =,改成:
date.timezone ="Asia/Taipei"
# 建議要設,避免部份網站程式的時間有時差。
PHPIniDir "D:\Web\php-7.1.5"
# 指定 php.ini 存放的資料夾位置。

LoadModule php7_module "D:\Web\php-7.1.5\php7apache2_4.dll"
# 載入 php 的模組。

AddType application/x-httpd-php .php .php3 .phtml .inc
# 指定附檔名是 .php .php3 .phtml .inc 的程式都為 php 程式。

AddType application/x-httpd-php-source .phps .phpsource
# 指定附檔名是 .phps 時,
# 把內容視為 hightlight 的原始碼輸出到網頁。

# 搜尋 DirectoryIndex,在後面增加:
index.php
<?php phpinfo(); ?>
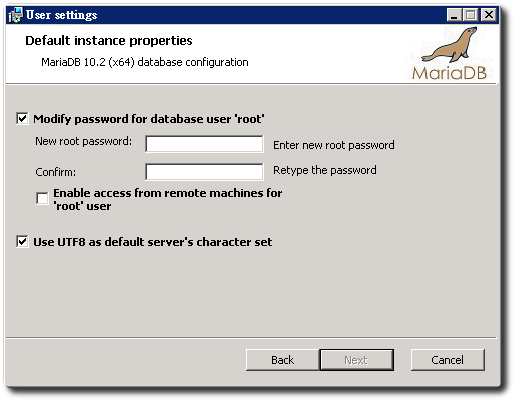
【MariaDB】
- 到 Official page 下載 msi(x64),直接安裝。
- 設 root 密碼。
- 取消勾選【Enable access from remote machines for ‘root’ user】,以降低風險。
- 勾【Use UTF8 as default server’s character set】。
【phpMyAdmin】
- 下載壓縮檔,解壓縮,複製到 Apache24\htdocs。
- 打開 PHP 的 php.ini。
- 拿掉 #extension_dir = “ext” 的 # 註解,”ext” to “D:\Web\php-7.1.5\ext”。
- 拿掉 #extension=php_mbstring.dll 的 # 註解。
- 拿掉 #extension=php_mysqli.dll 的 # 註解。
–2019/01/05 更新
- 將 config.sample.inc.php 更名為 config.inc.php。
- 打開 config.inc.php,找到 $cfg[‘blowfish_secret’],在後面單引號內填入 32 位數的密碼,可直接找密碼產生器產生就好。
- 加入一行 $cfg[‘PmaNoRelation_DisableWarning’] = ‘true’;,以避免 phpMyAdmin 跳出錯誤訊息,要求建立資料表。
【參考連結】
- Windows 7 安裝 Apache + MySQL + PHP ~ JxL Blog 技術札記
- Manual installation of Apache、MySQL、PHP and related settings – OA’s blog
- Manually installing Apache on Windows、PHP、MySQL、phpMyAdmin | Beyond The Time
- XYZ's notebook: Installing Apache on Windows 7 64-bit、PHP、MySQL
- Blue Ocean Studio – View topic – phpMyAdmin setup
- phpMyAdmin setting blowfish secret
- Difference between PHP Non Thread Safe and Thread Safe – WaiMai Blog
- Multithreading – PHP Thread Safe and Non-Thread Safe for Windows – Stack Overflow
- PHP on Windows + Apache mod_fcgid installation method | Villain's secret room

")
")


