
 最近把家裡的電腦汰換,組了一台Ryzen 3 2200G的迷你電腦,藉這機會也換掉已經使用十年出頭的ubuntu,ubuntu從我出社會開始試用,沒想到這麼一用就用了十年,近幾年已經比較少跟著新版本的釋出而更新,因為更新似乎也沒有帶來什麼明顯的感受,所以都是等硬體有異動時才會順便換成新版本的ubuntu。
前幾個月在網管人雜誌看到Manjaro這個新面孔,勾起我一點興趣,後來在確定要換電腦時,上網查了Manjaro的資訊,看起來在台灣使用的人還不算多,但我還是決定要趁這次換電腦時,一併把ubuntu也換掉,讓自己體驗不同的Linux發行版。
前兩週新電腦入手後,便開始著手安裝Manjaro,我先嘗試使用官方推薦的XFCE Edition,但在光碟開機要進live環境時就發生卡關情形,畫面停在”Started TLP system startup/shutdown.”就不動了,上網查詢原因,有國外網友表示他改安裝Manjaro-Architect版本即可避免此問題,查詢了一下Architect版本可以算是一種自訂化的安裝版本,在安裝的過程可以自行決定要安裝哪些套件,並即時從網路下載最新版本的套件,因此此篇即為介紹Manjaro-Architect版本的安裝過程。
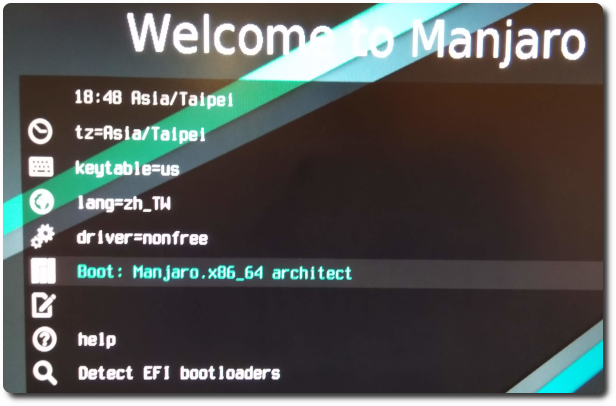
使用Manjaro光碟/隨身碟開機後,設好地區及語言後,選擇「Boot: Manjaro.x86_64 architect」。
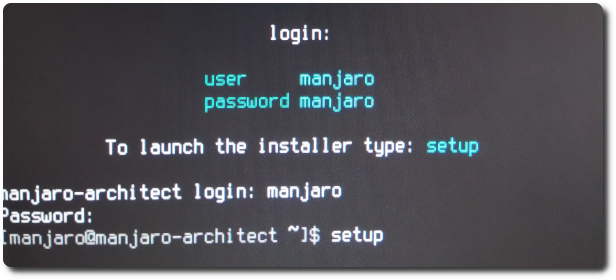
依照畫面提示以manjaro / manjaro的帳密登入,接著輸入「setup」。
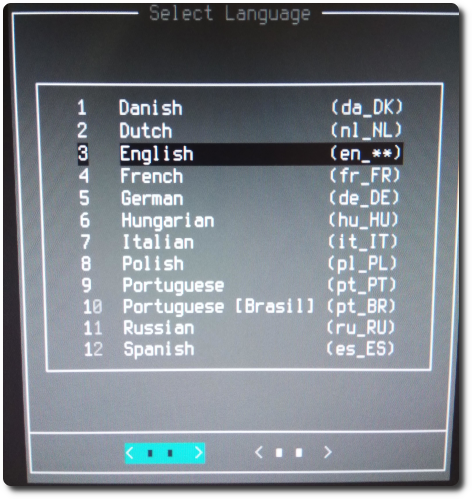
安裝過程的語言選擇「English」。
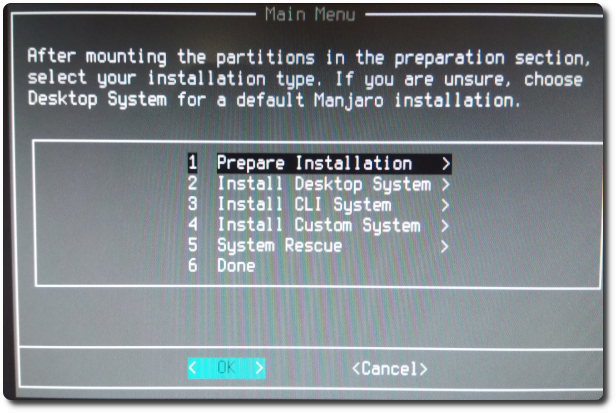
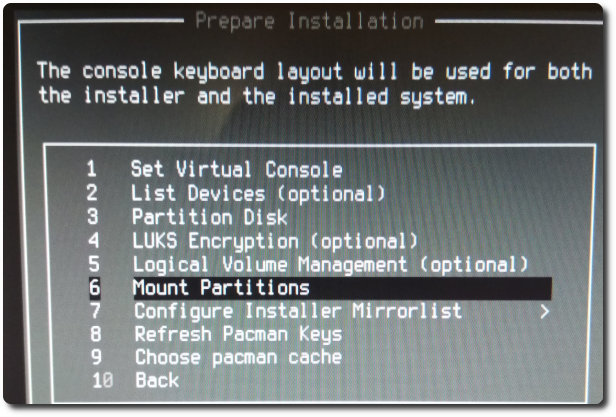
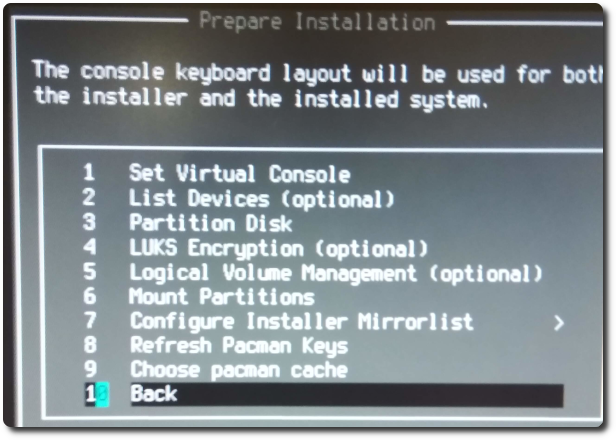
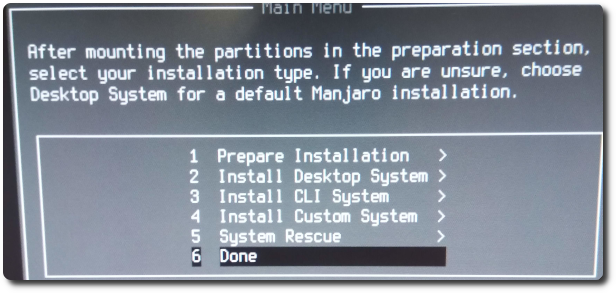
接著準備開始安裝,首先進入第一大類「Prepare Installation」,進行安裝前置作業。
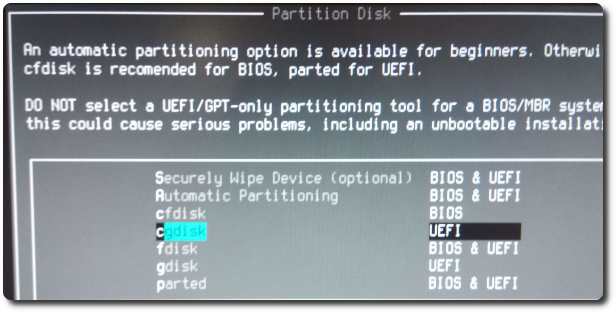
第1、2項可以跳過,直接進入第3項的「Partition Disk」。

這邊有幾個磁碟工具可以使用,由於我是UEFI,在瀏覽全部工具的介面後,我選擇「cgdisk」這個我認為相對比較好操作的工具。
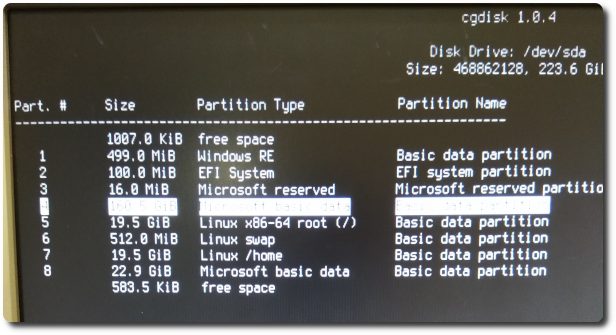
在cgdisk中,可以對磁碟進行分割,並設定要作為Manjaro磁區的Partition Type。
完成後接著可略過第5項,進行第6項磁區掛載「Mount Partitions」。
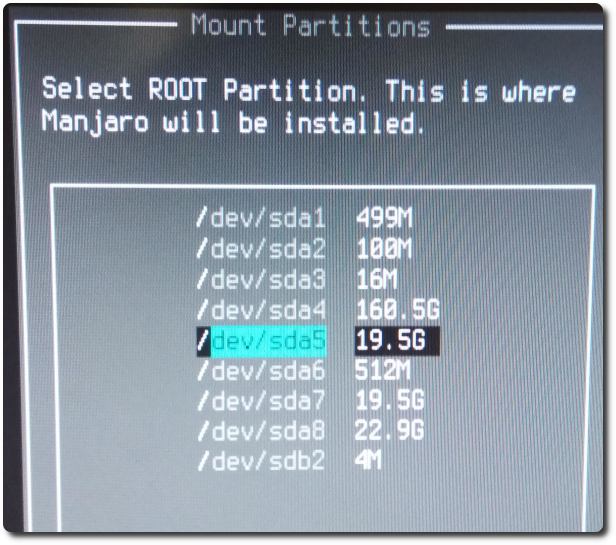
首先指定要掛/root的磁區。(由於我還有一個Windows系統,所以畫面中磁區有很多個)
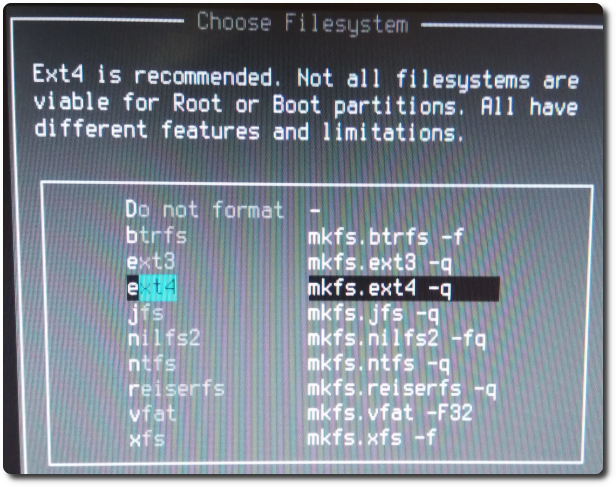
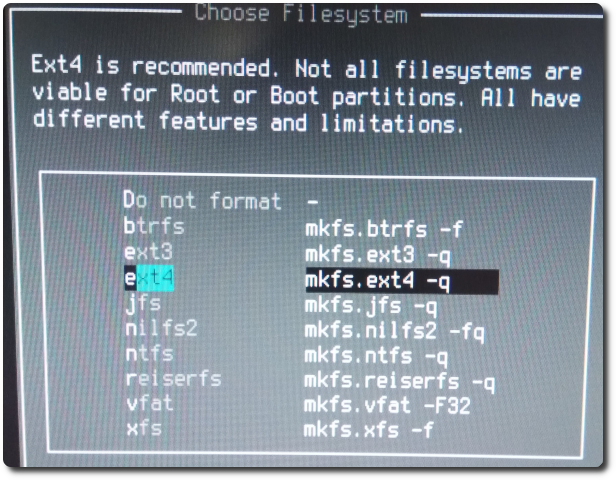
選擇/root的磁區格式,就直接用建議的ext4。
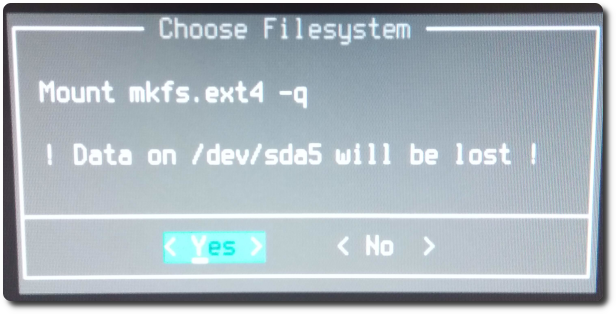
畫面提醒該磁區準備格式化,資料會刪除,點Yes繼續。
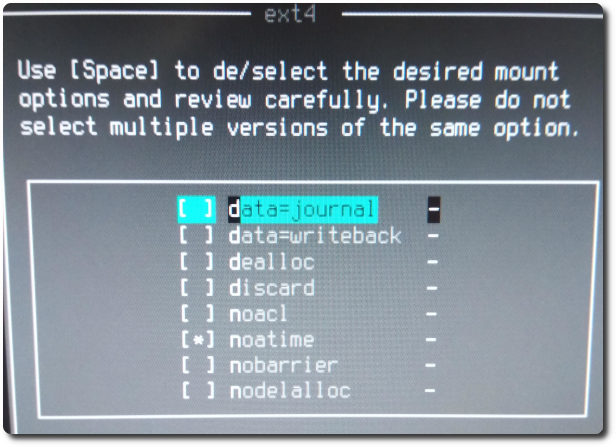
這邊我不確定作用是什麼,就選預設的「noatime」。
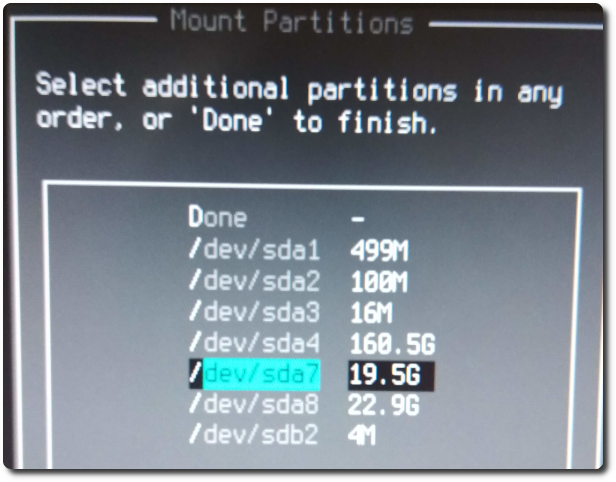
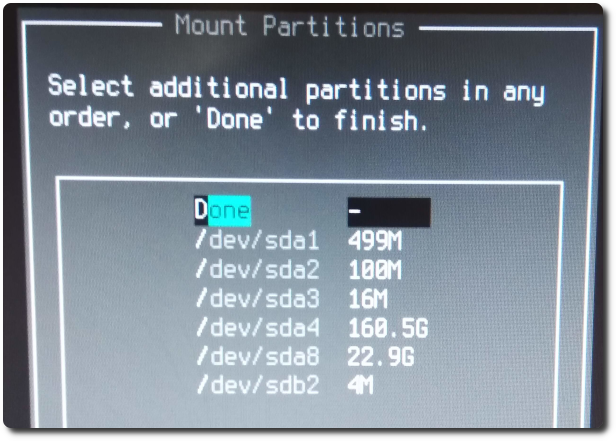
之後會要掛/swap,方式同/root,就不再截圖。最後他會問還有沒有其他要掛載的,由於我習慣會將/home也掛載到獨立磁區,就要在此時設定。先選擇磁區。
選擇ext4。
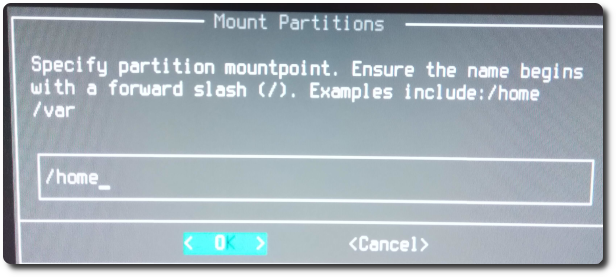
這邊要告知要掛載什麼目錄,以我來說就輸入/home。
又回到這個畫面,如果沒有其他要掛載的,選擇Done即可。
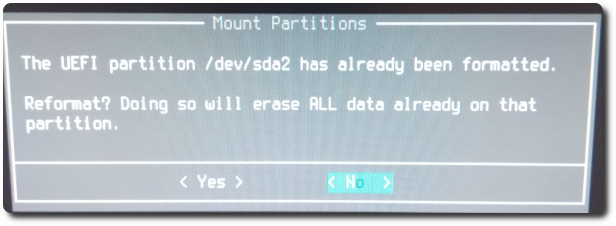
接著要告知UEFI的磁區,由於我已經先安裝Windows,Windows有個100MB的磁區即為UEFI磁區,如果不定是哪個的話,可以進Windows的磁碟管理確認磁區淚類型。
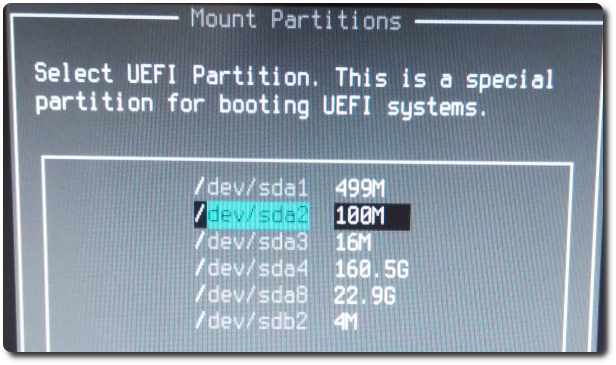
這邊會問要不要清除UEFI磁區的資料,我選擇「No」。
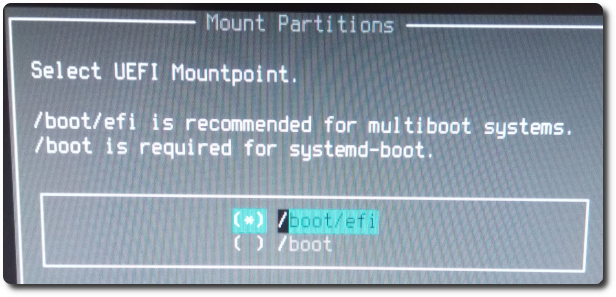
選擇預設的「boot/efi」。
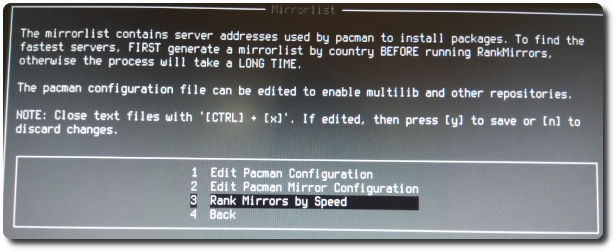
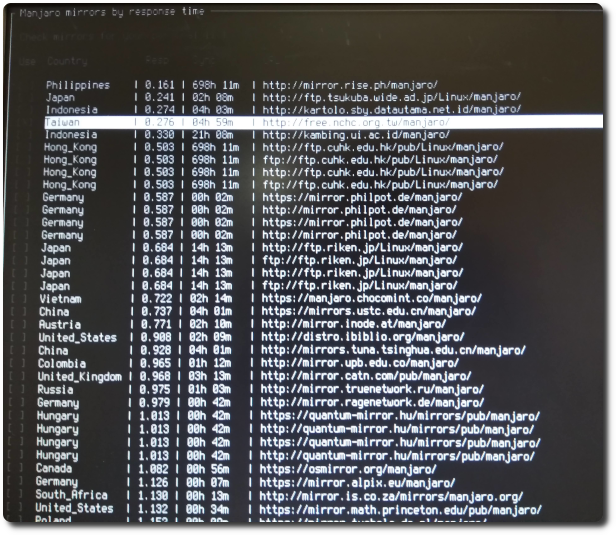
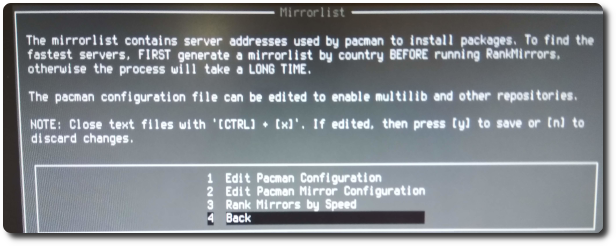
再來要進行Mirror站點設定。

直接選擇第3項,讓系統依照各站點的網路反應時間來排序。
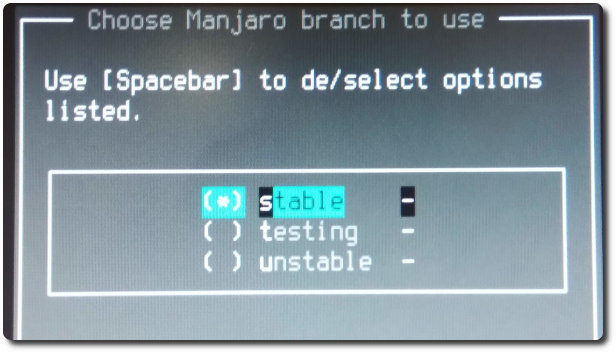
套件版本類型我選擇穩定的「Stable」。
等他跑幾分鐘後,會由快到慢列出各個站點,我選擇「Taiwan」的站點。
after finishing,點「Back」回上一層。
再點「Back」回上一層。
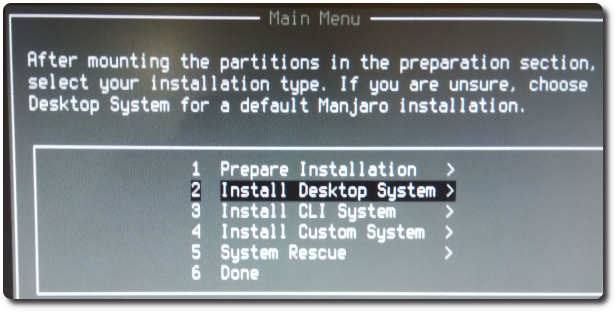
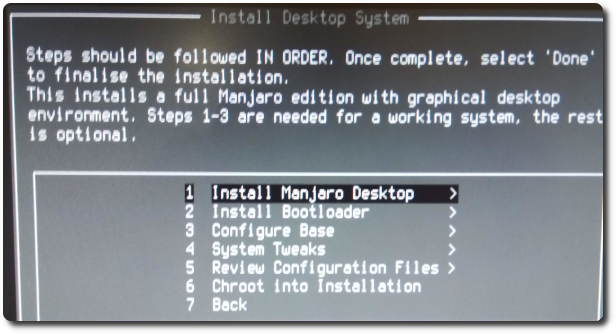
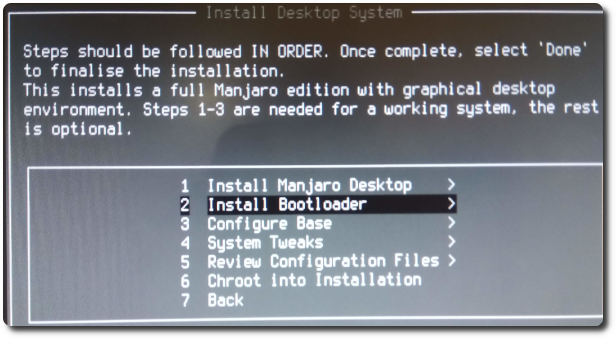
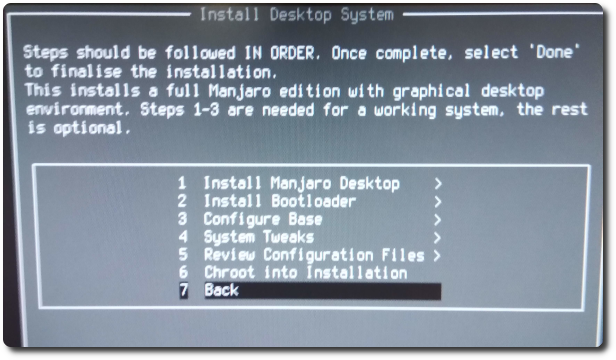
接下來就要開始安裝Manjaro,選擇「Install Desktop System」。
選擇第1項的「Install Manjaro Desktop」。
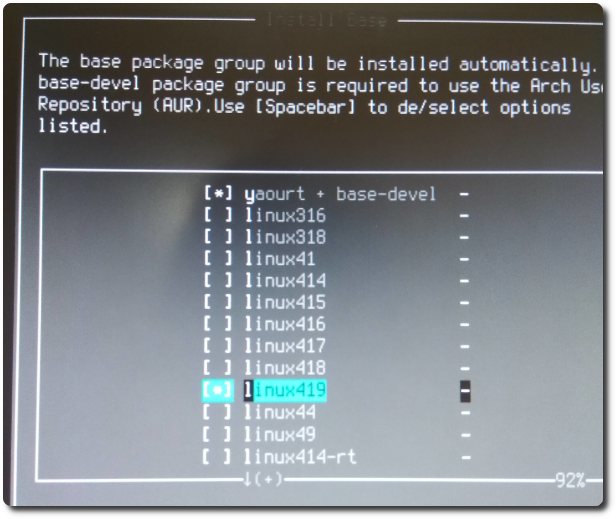
我選擇最新的4.19 kernel,另外還有yaourt(為了有豐富資源的AUR套件庫)。
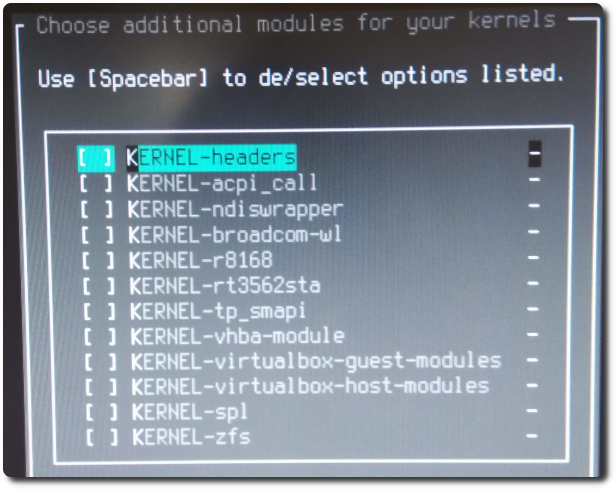
這邊Module可以不用選。
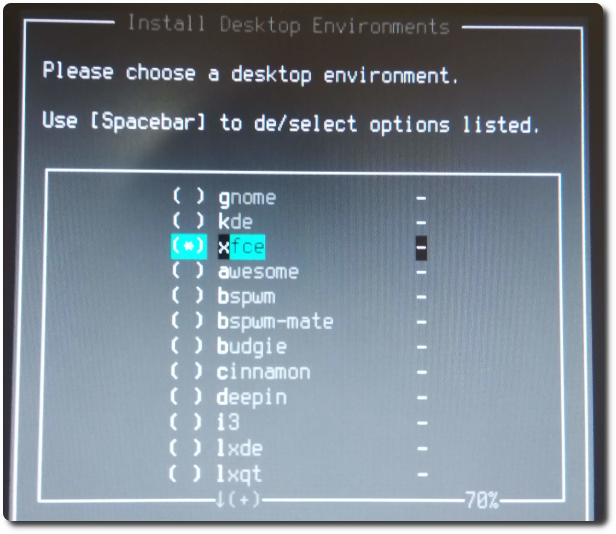
選擇xfce桌面環境。
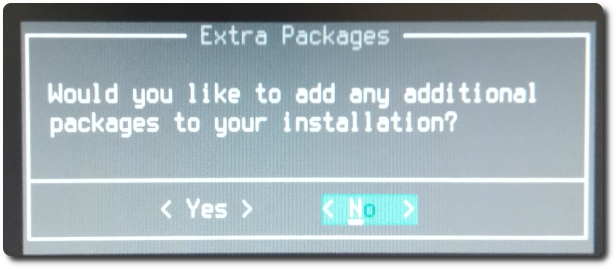
這邊會問有沒有其他的元件要裝,如果有特殊驅動要安裝的,可以在這邊進行,我選擇「No」。
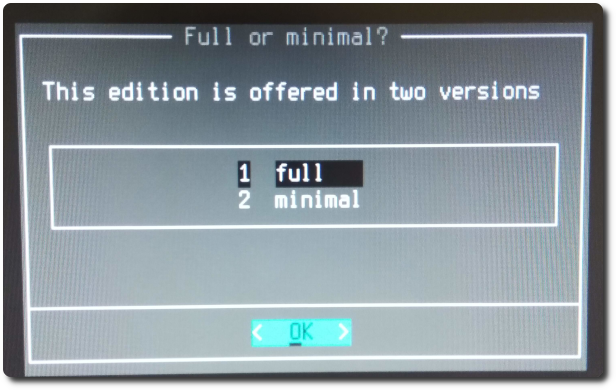
這邊是問要安裝xfce的版本,我上網查後,一般除非你是簡易測試環境,否則就直接選「full」即可。
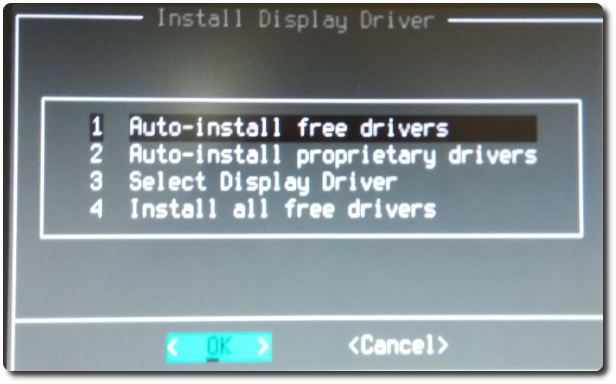
顯示驅動可選擇「Auto-install free driver」。
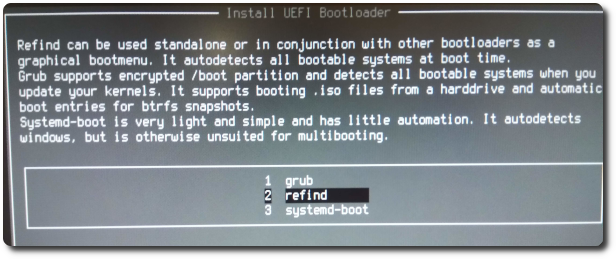
接著要安裝開機選單,選擇「Install Bootloader」。
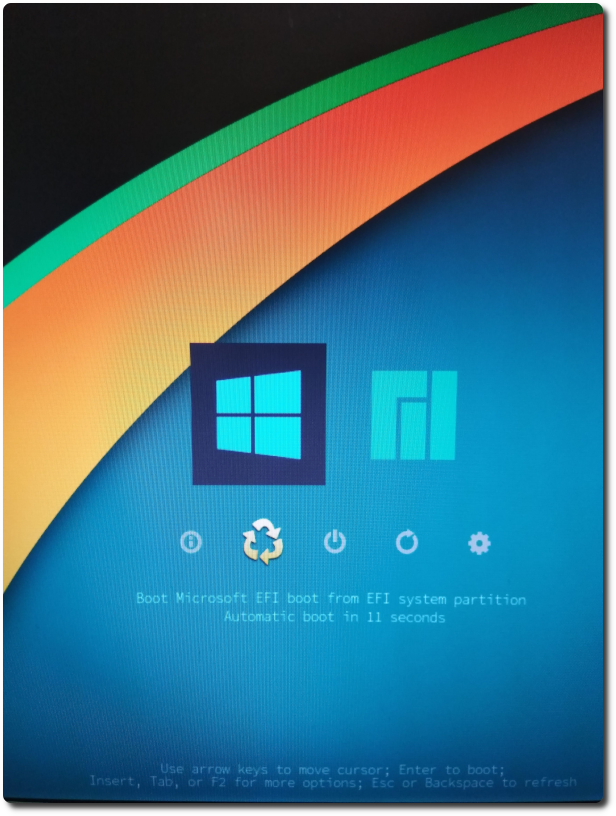
以往都是用grub,這次改試用「refind」。(後來發現refind的介面實在是正點且好用)
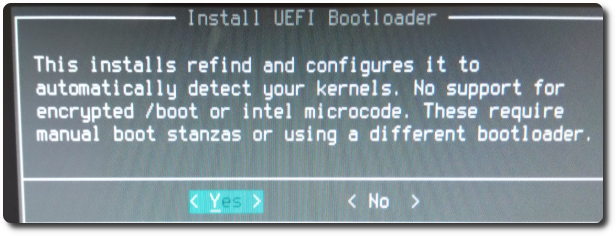
選「Yes」。
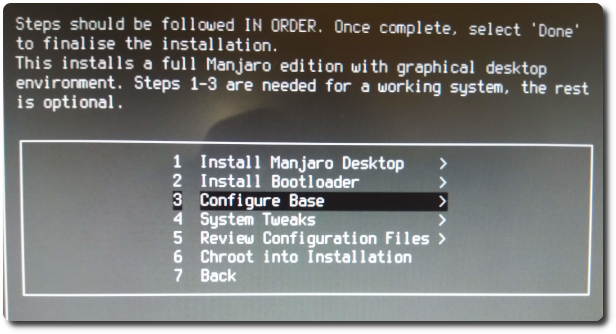
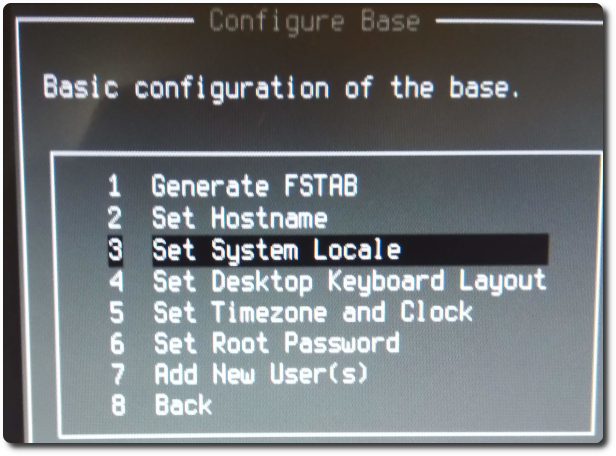
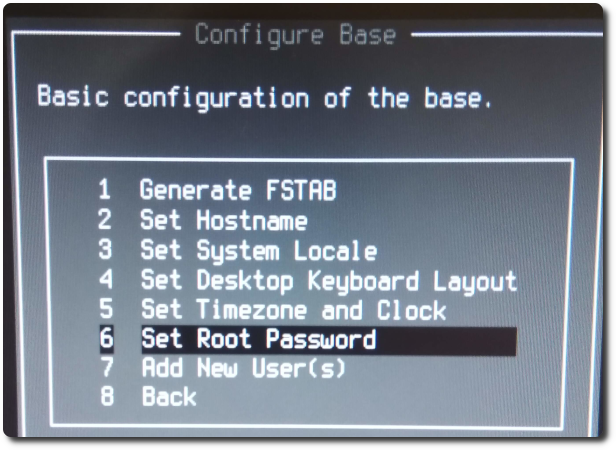
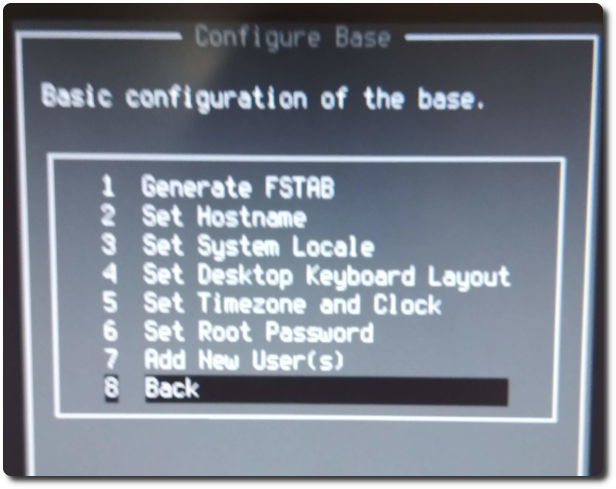
接著選「Configure Base」進行一些基礎設置。
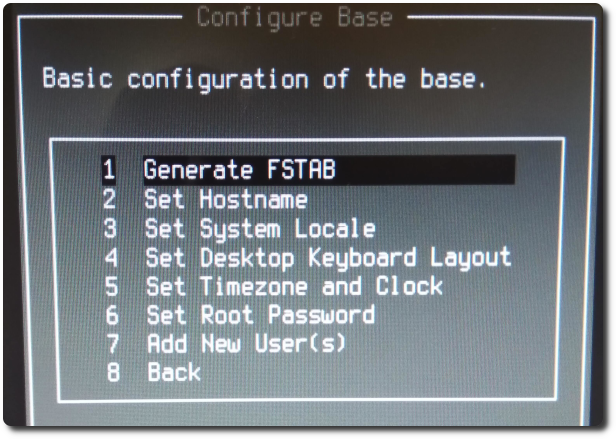
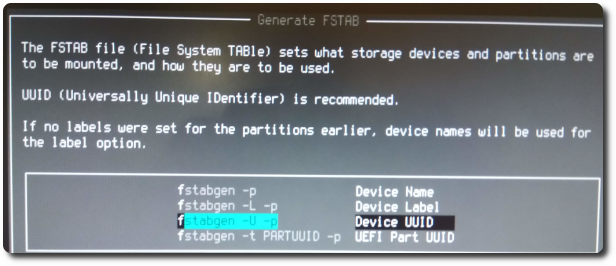
首先選「Generate FSTAB」產生磁碟開機掛載列表。
選擇建議的「Device UUID」方式。
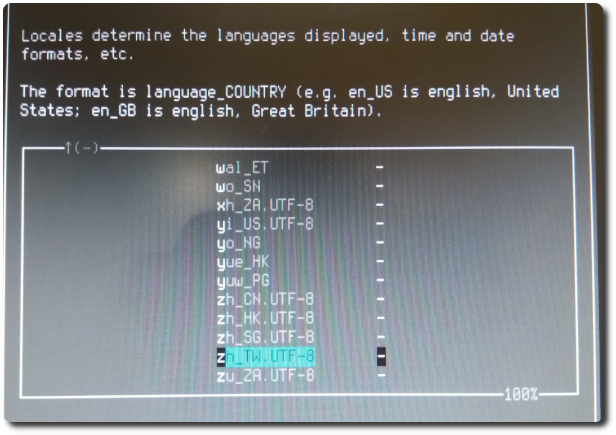
再來設定「Set System Locale」。
選擇「zh_TW. UTF-8」。
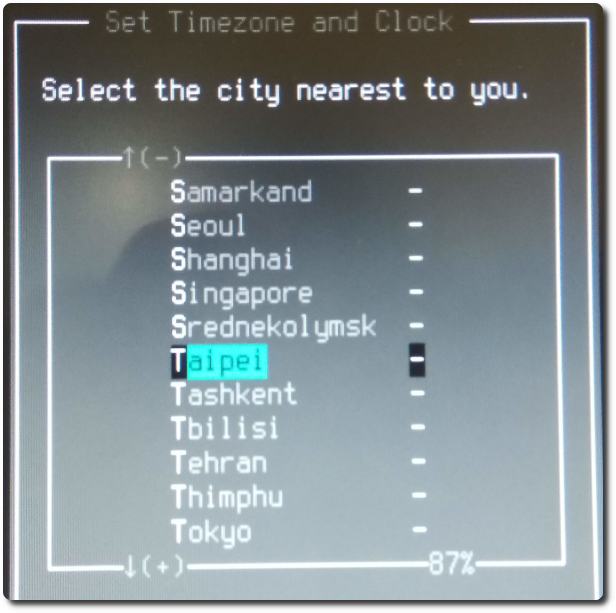
選擇「Set Timezone and Clock」。
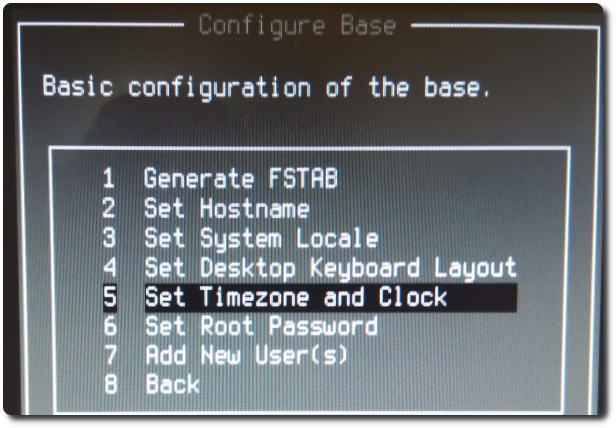
選擇「Taipei」。
因為我還有windows系統,所以依建議選擇「localtime」。
設定「Set Root Password」。
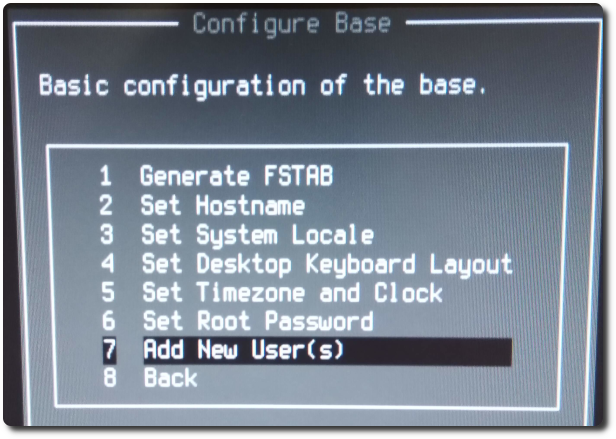
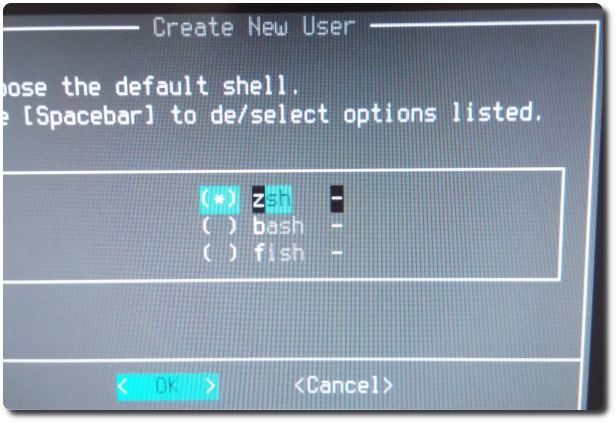
Select 'Add New User'(s)」。
For shell, I chose the default 'zsh'。
點「Back」回上一層。
再點「Back」回上一層。
Click 'Done' to finish the installation。
After restarting,Then you can see the beautiful refind boot menu。
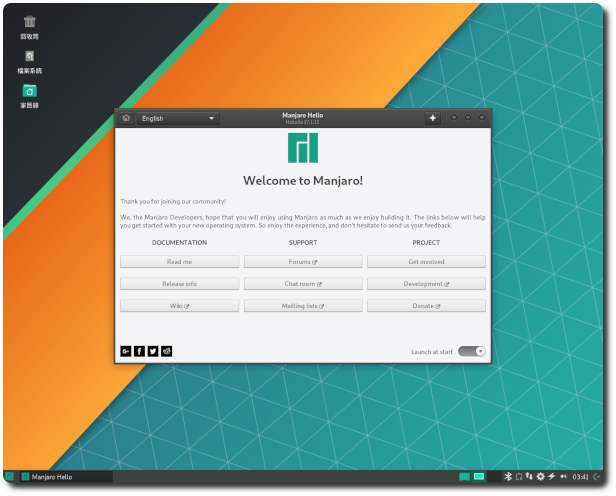
Welcome Manjaro~
【參考連結】
- For record-keeping: 107.02.20 Manjaro and Win10 dual system
- Installation with Manjaro-Architect ISO – Technical Issues and Assistance / Tutorials
– Manjaro Linux Forum

")
")


Leave a Reply