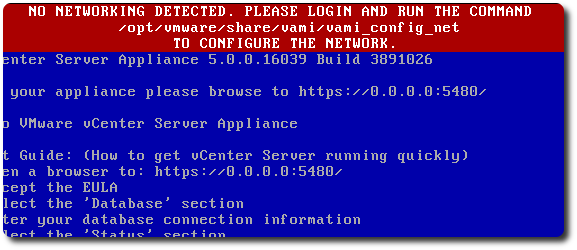
 昨晚第一次透過Web連進vCenter Server Appliance,看一看相關資訊後,發現可直接透過Web做update修補,便點了下去。更新完後,畫面顯示需要重開,把vCenter Server Appliance重啟後,便出現”NO NETWORKING DETECTED. PLEASE LOGIN AND RUN THE COMMAND /opt/vmware/share/vami/vami_config_net TO CONFIGURE THE NETWORK”的錯誤訊息。

上網咕狗,很快找到官方的KB,正當開心KB所描述的情形跟我一模模一樣樣時,沒想到解決方式竟然是提醒說更新前,記得做快照…,然後就教怎麼把網卡設定檔做備份,等遇到這問題時,就有解了。看完瞬間晴天霹靂,後來不死心的試各種方式,結果發現無法將IP寫入設定檔,加上前面KB的說明,想想應該是網卡設定檔異常。
隨即試著幫Appliance環境新增一張VMXNET3的網卡,重開之後仍無效,再上網查詢”failed to read network interface files for eth1″的處理方式,又找到另外一篇KB,依照下列步驟重新設定新的網卡:
::Copy the /etc/sysconfig/networking/devices/ifcfg-eth0 to /etc/sysconfig/networking/devices/ifcfg-eth1 file by running this command:

cp /etc/sysconfig/networking/devices/ifcfg-eth0 /etc/sysconfig/networking/devices/ifcfg-eth1

::Open the ifcfg-eth1 file using a text editor.

::Delete the vi /etc/sysconfig/networking/devices/ifcfg-eth1 command as it is specific to the vi editor. The user can choose to use any editor for this purpose.

::Edit the file adding values for your network.

::For example:

DEVICE=eth1
BOOTPROTO='static'
STARTMODE='auto'
TYPE=Ethernet
USERCONTROL='no'
IPADDR='192.168.1.117'
NETMASK='255.255.255.0'
BROADCAST='192.168.1.255'

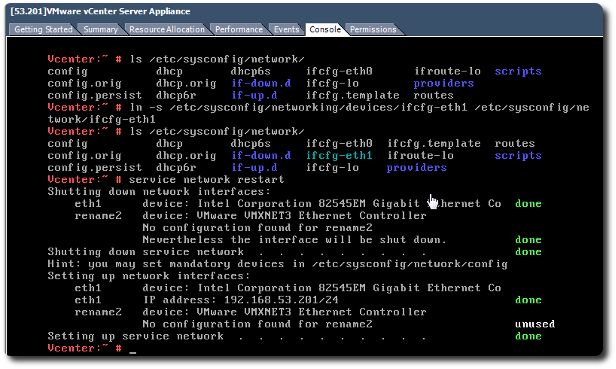
::Create a symlink for this file in /etc/sysconfig/network by running this command:

ln -s /etc/sysconfig/networking/devices/ifcfg-eth1 /etc/sysconfig/network/ifcfg-eth1

::Restart the networking service to activate the new setup, by running this command:

service network restart
做完之後,Appliance總算復活,看起來是更新之後,不知道為啥他要去不存在的eth1 (原本是eth0),因此只要新增網卡,再把相關設定好,即可解決。

【參考連結】


發佈留言