
 上回抱著嘗試的心態在 SSL For Free 申請 Wildcard 憑證 (*.abc.com),沒想到申請成功了,原本還以為 Let’s Encrypt 只能針對個別網址進行申請。最近由於憑證快滿三個月,便準備再進行申請,卻發現 SSL For Free 被 ZeroSSL 買下來後,針對 Wildcard 憑證的申請,只能以付費的方式購買,因此只好放棄此平臺的服務。
在網路搜尋一些資訊後,大多數文章都是建議使用 Let’s Encrypt 推薦的 Certbot 工具,既可以申請憑證,還能自動展延。但我實際試用後,在網址驗證這段出現一些問題而無法順利進行,因此只好作罷。
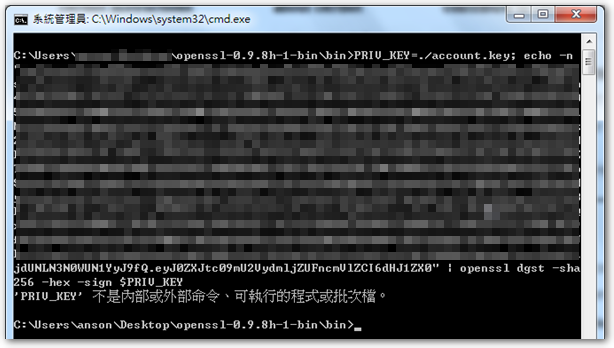
之後試著搜尋可以像 SSL For Free 那樣線上申請憑證的網站,最後找到 Get HTTPS for free! 這個不太起眼但很棒的網站!Get HTTPS for free! 是個 open source 的網站,網頁的頁面很簡陋,但是說明很詳細。試著依照上面的步驟進行,可惜在步驟 3. 要透過 openssl 驗證時,網頁說明的指令在 Windows 環境似乎無法運行,因此再度卡關。
好在後來在 Cook Wu’s Murmurs 的文章 得知,有網友針對 Get HTTPS for free! 寫了一個可以在 Windows 運行的超方便協力工具 – GetHttpsForFree-UI,只要把 openssl 的位置在 GetHttpsForFree-UI 設定好,後面搭配網頁的步驟一步一步進行,幾乎都只要複製貼上就好,不需用到指令。
下面為以「Get HTTPS for free!」+「openssl」+「GetHttpsForFree-UI」申請「Let’s Encrypt wildcard 憑證」的說明:
※ 如果是要續簽憑證,把前一次的 account.key、domain.key 及 openssl.cnf 放到指定位置,並設定好 OpenSSL Path 及 Working Path,先做步驟 10.,接著從 12. 依序做下去即可。
1. 下載 openssl for windows,並解壓縮。
2. 下載 GetHttpsForFree-UI.exe。
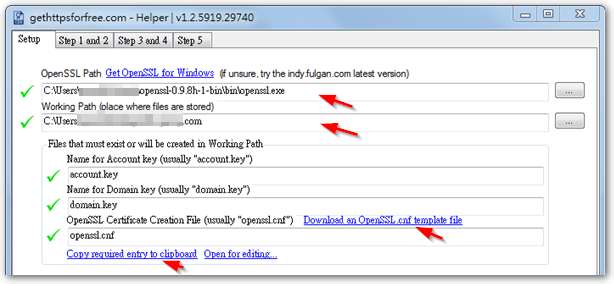
3. 執行 GetHttpsForFree-UI.exe,在 OpenSSL Path 設定 openssl.exe 的位置。
4. 在 Working Path 設定一個待會要存放「憑證」及「金鑰」的目錄。
5. Account key 與 Domain key 的檔案名稱可以使用預設值。
6. openssl.cnf 檔可以在 openssl\share 目錄底下找到,也可以點選「Download an OpenSSL.cnf template file」,下載範本檔,我這邊選擇後者。下載範本檔後,存到 Working Path 的目錄。
7. 點選「Copy required entry to clipboard」,此時剪貼簿會含有 openssl.cnf 所需的參數,接者打開剛剛的 openssl.cnf,在最後一行「貼上」。
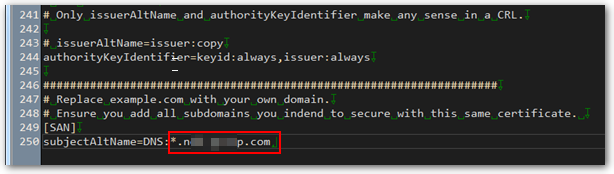
8. 修改剛剛貼上的 subjectAltName 參數,將後面的網址改成 *.abc.com。
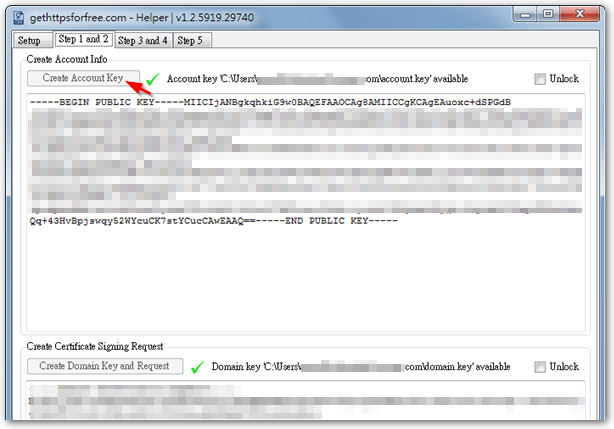
9. 回 GetHttpsForFree-UI.exe 工具,切換到「Step 1 and 2」頁面,按下「Create Account Key」,此時會產生 Let’s Encrypt 所需的郵件帳號的 Public key 內容,並自動複製到剪貼簿。另外 Working Path 資料夾會產生一個 account.key 的私鑰檔。
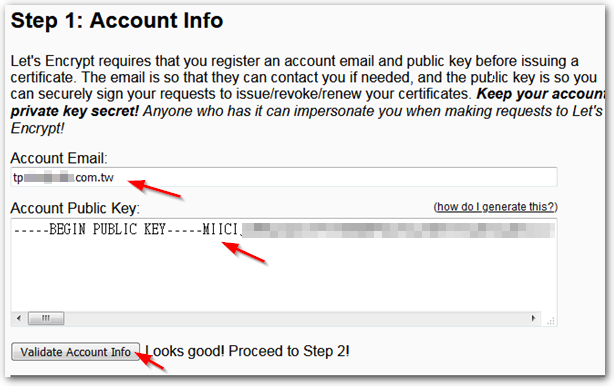
10. 到「Get HTTPS for free!」網站,於 Step 1 輸入 Email 及貼上剛剛的 Public key,並按下「Validate Account Info」。
11. 回 GetHttpsForFree-UI.exe 工具,按下「Create Domain Key and Request」,此時會產生 CSR 內容並自動複製到剪貼簿。另外 Working Path 資料夾會產生一個 domain.key 的私鑰檔。
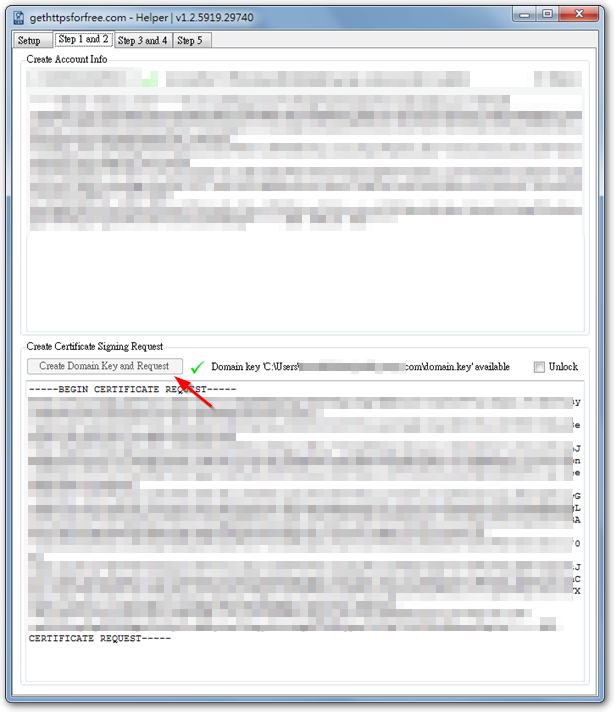
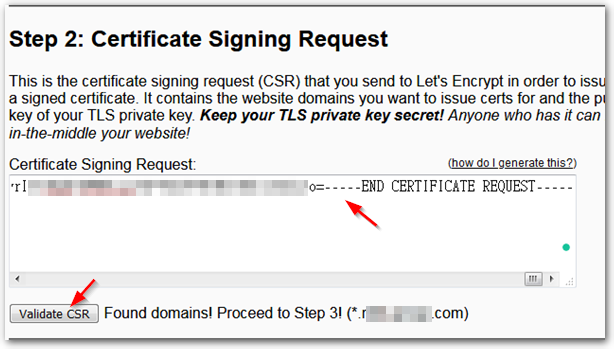
12. 到「Get HTTPS for free!」網站,於 Step 2 貼上剛剛複製的 CSR 內容,並按下「Validate CSR」。
13. 同樣在「Get HTTPS for free!」網站,將 Step 3「Accept the Let’s Encrypt terms and condition」下的指令複製起來。
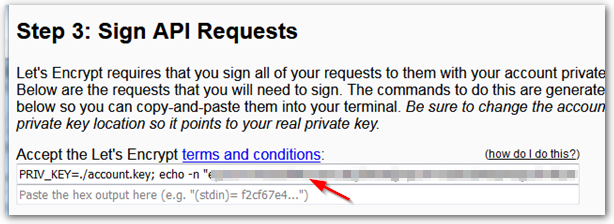
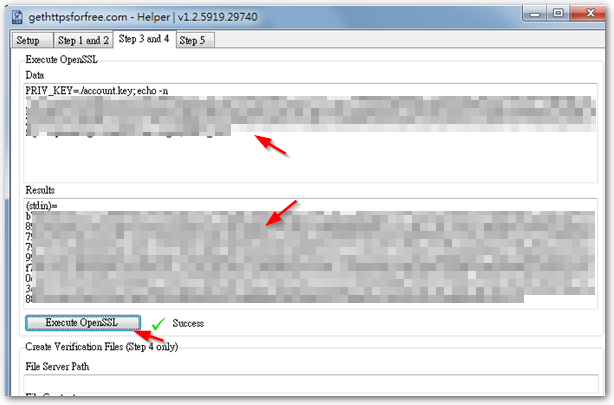
14. 回 GetHttpsForFree-UI.exe 工具,切換到「Step 3 and 4」頁面,貼到「Data」欄位,並點擊「Excute OpenSSL」,此時會自動將「Result」欄位的資料複製到剪貼簿。
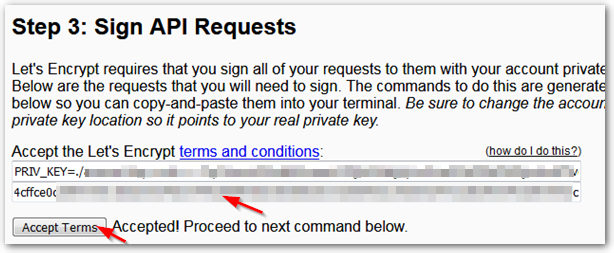
15. 再回到「Get HTTPS for free!」網站,將剛剛的值貼到指令下方的欄位,並按下「Accept Terms」。
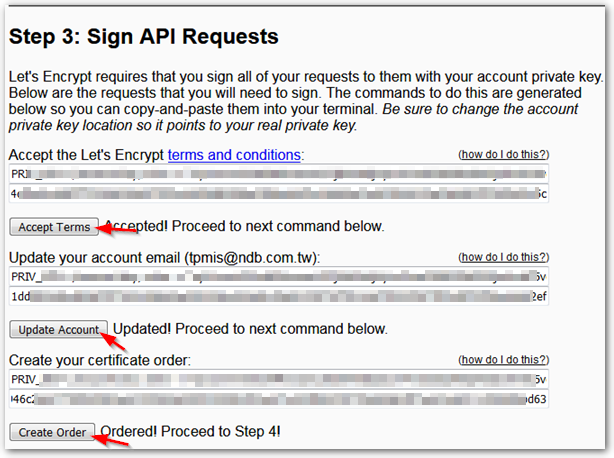
16. 重複上面步驟,完成「Get HTTPS for free!」網站上 Step 3 的其他欄位。
17. 在「Get HTTPS for free!」網站的 Step 4,重複前面步驟,在產生驗證值後,按下「Load Challenges」。
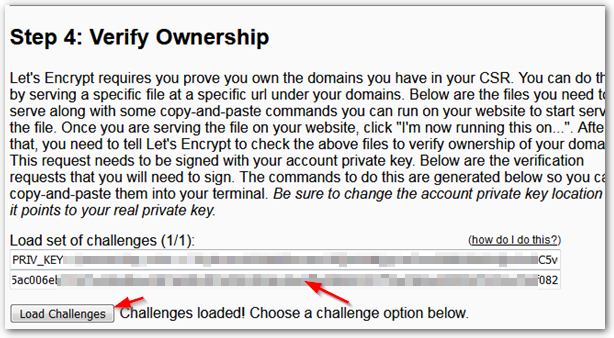
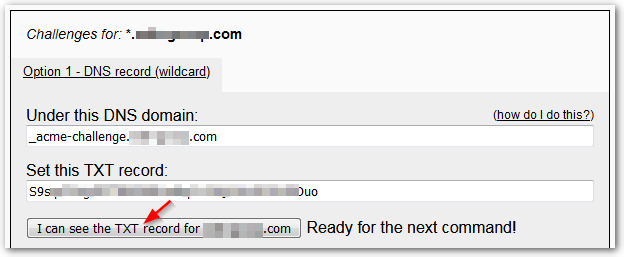
18. 接著下方會產生要在 DNS Server 新增的 TXT 資訊,完成新增後,點選「I can see the TXT record for abc.com」。
19. 將「Get HTTPS for free!」網站的 Step 4 剩下的指令欄位,都比照前述步驟,貼到 GetHttpsForFree-UI.exe 執行完再貼回網站,並按下對應按鈕。
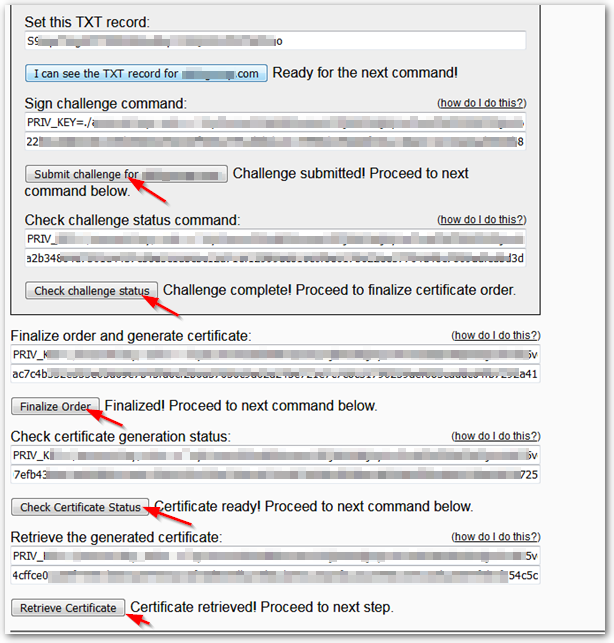
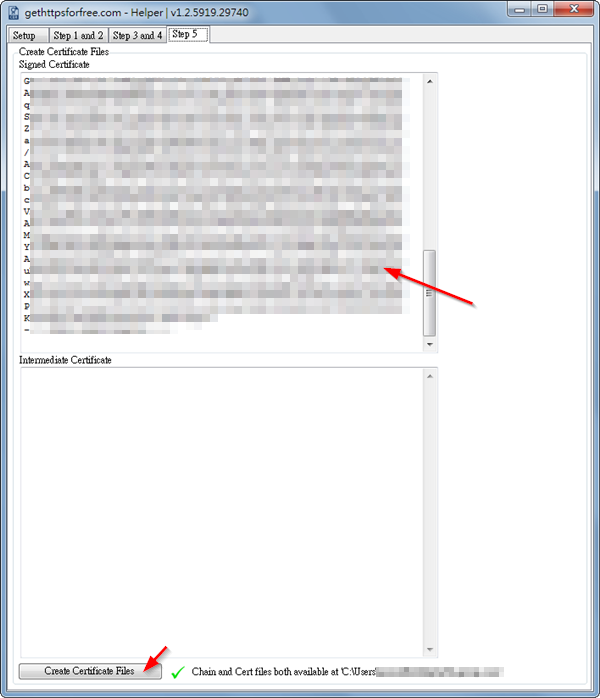
20. 在「Get HTTPS for free!」網站的 Step 5 (最後一步),複製「Signed Certificate Chain」的內容。
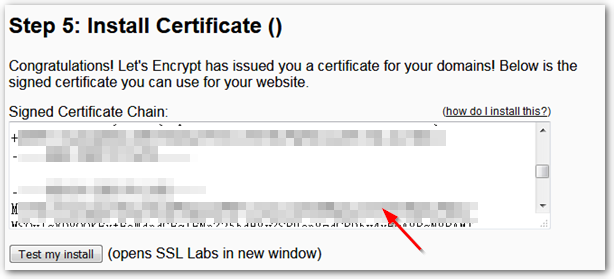
21. 回 GetHttpsForFree-UI.exe 工具,切換到「Step 5」頁面,在「Signed Certificate」貼上剛剛複製的值,並按下下方的「Create Certificate」,便會在 Working Path 資料夾會產生 .crt 的伺服器憑證檔案。
到這邊就已經完成 Let’s Encrypt 的 wildcard 憑證申請,深深覺得 GetHttpsForFree-UI.exe 這工具真的很方便,很感謝作者,另外作者也有錄製 教學影片,其實看完影片,就會大概知道怎麼進行了,建議可以先看過一遍。
【番外篇】
如果要將 crt 伺服器憑證檔轉成 PFX 檔,可以參考 保哥的這篇,裡面有很詳盡的說明。
◎ 透過下面指令,將 「crt 伺服器憑證檔」與「domain.key 私鑰」合併成 PFX 檔。
openssl pkcs12 -in abc.com.crt -inkey domain.key -export -out abc.com.pfx -password pass:1234
# 1234 是匯入密碼,請自行修改。
【2020/08/04 補充】
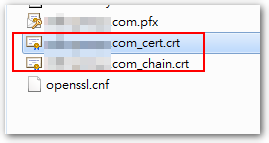
上述程序所產生的檔案說明如下:
【openssl.cnf】
# 讓 OpenSSL 產生憑證的範本檔。

【account.key】
# Let's Encrypt 郵件帳號的私鑰檔。

===============================

【domain.key】
# 產生 CSR 時的私鑰檔。

【abc.com_cert.crt】
# 主要憑證檔。

【abc.com_chain.crt】
# 根憑證 (root)。

【abc.com.pfx】
# 使用 openssl 將「abc.com_cert.crt (主憑證)」與
# 「domain.key (私鑰)」合併轉換而成。
【參考連結】
- Get HTTPS for free!
- Let’s Encrypt Generating in Windows « Cook Wu’s Murmurs
- GitHub – sverrirs/GetHttpsForFree-UI: A .NET Windows UI client for the gethttpsforfree.com website. This client automates large parts of the process of obtaining a SSL certificate on Windows.
- OpenSSL for Windows
- 如何在收到 PFX 或 CER 憑證檔之後使用 OpenSSL 進行常見的格式轉換 | The Will Will Web
- How to create a free SSL certificate for your website (Turn on Annotations) – YouTube

")
")


好棒的圖文教學,真是幫大忙了。
LINE API 會挑憑証發行單位,Let’s Encrypt 的萬用網域憑証太
好用了呀~
謝謝老森常譚的大方、無私分享!
感謝您!
很高興對你有幫助,不客氣~ :)
感謝分享!
不客氣 🙂
請問透過此方式申請,也是3個月要更新一次嗎?
有點懶了…
是的,要手動展延。
如果要自動的話,可以考慮官方推薦的Certbot程式哦。